Next.js-based Application Security Insights
Next.js can be an interesting choice when building your new full-stack application. What should you keep in mind when doing so from the security perspective? In this article, I will highlight common mistakes that may occur when writing code with Next.js framework. Moreover, you will find out how I discovered CVE-2023-48309 in the NextAuth.js, Next.js-compatible authentication library.


Next.js-based Application Security Insights
Next.js is a framework built on top of the React library. It addresses some of React’s limitations and allows building full-stack web applications. Easy-to-set-up, performance-oriented, and SEO-friendly are definitely the words that describe Next.js. All of this is made possible through features like React Server Components (RSC), Server-side Rendering (SSR), and Server Actions. However, with great power comes great responsibility. When using Next.js, there are certain details worth knowing from a security perspective.
Connect with our AI Expert on LinkedIn!

#1 Cross-Site Scripting – should I worry about it?
React provides battle-tested protection against XSS attacks, which would imply that Next.js is also resistant to such attacks. In general, this is true because default configuration applies context-sensitive output encoding before data ends up on the page. However, let’s take into consideration the following scenarios:
dangerouslySetInnerHTML function
As the name itself suggests, this function can indeed be dangerous – especially when user input is passed to it.
return ( [...] <div dangerouslySetInnerHTML= {{__html: query }}></div> );} Passing <img src=x onerror=alert(1)> payload into a query variable (via query parameter, e.g.) will result in JS code execution:

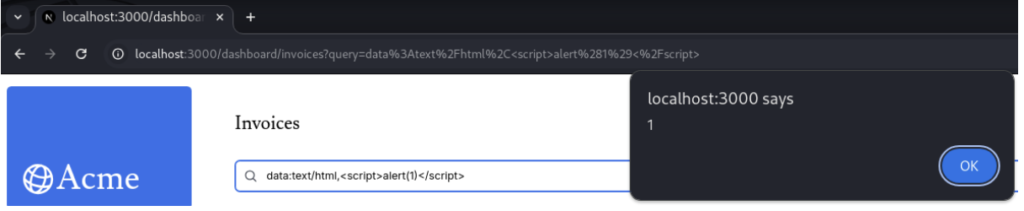
iframe src attribute
What about the following example?
return ( [...] <iframe src={query}></iframe> );} If you have the possibility to inject the URL into the src attribute of the iframe tag, the malicious code can also be executed. The result of the data:text/html, <script>alert(1)</script> payload will be as follows:
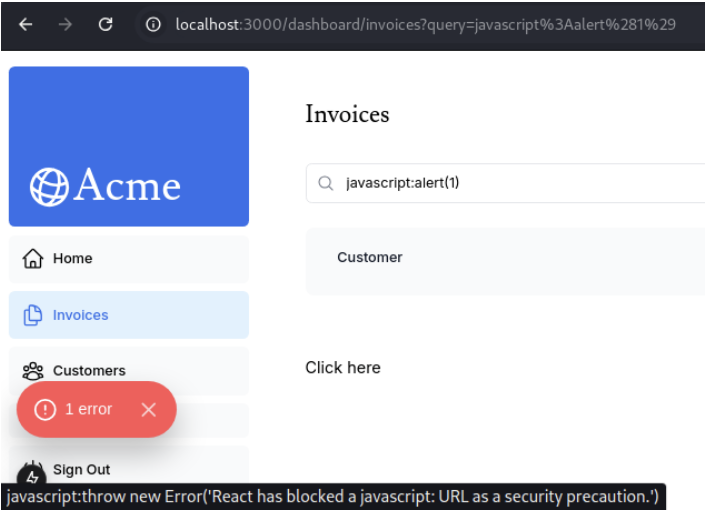
A href attribute
What do you think will happen in this scenario?
return ( [...] <a href={query}>Click here</a> );} Sometime ago, in 2019 (during the 16.9.0 version deployment), React developers decided to deprecate javascript: URLs—and now they have finally done it.
In recent React/Next.js versions, this code will not be executed, and an error will be thrown:
These are just three edge cases, but they are not the only examples. But what am I actually trying to tell you? That your application might contain this or another ‘edge case’ type and be susceptible to injection attacks. That’s why it’s crucial, even for React-based applications, to sanitize and validate user input. This can significantly reduce the risk of any injections, not only Cross-Site Scripting attacks. If you must use functions like dangerouslySetInnerHTML, make sure to use a front-end library like DOMPurify to clean user-provided data from malicious input.
#2 Secrets exposed via Client Components
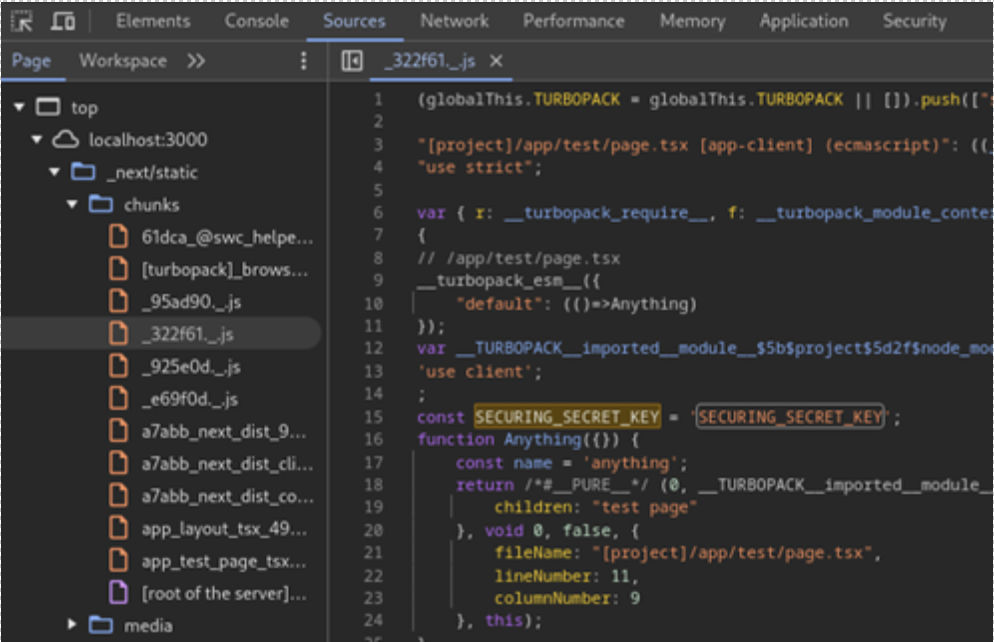
To put it simply, Client Component is a piece of code that runs directly in the user’s browser. This allows app developers to handle interactivity, use client-side JavaScript hooks, and browser APIs. The “use client” directive in a file means that it will be part of the client bundle – and make everything inside, including your code and secrets, publicly accessible.
Let’s take a look at the snippet code below:
// /app/test/page.tsx
'use client';

const SECURING_SECRET_KEY = 'SECURING_SECRET_KEY'

export default function Anything({ }: { }) {
 const name = 'anything'
 return(<div>test page</div>)
}
The SECURING_SECRET_KEY var can be found easily in Next.js-generated JavaScript file. The screenshot below presents browser’s dev tools view, which is one of many methods that can be used to find the secret:
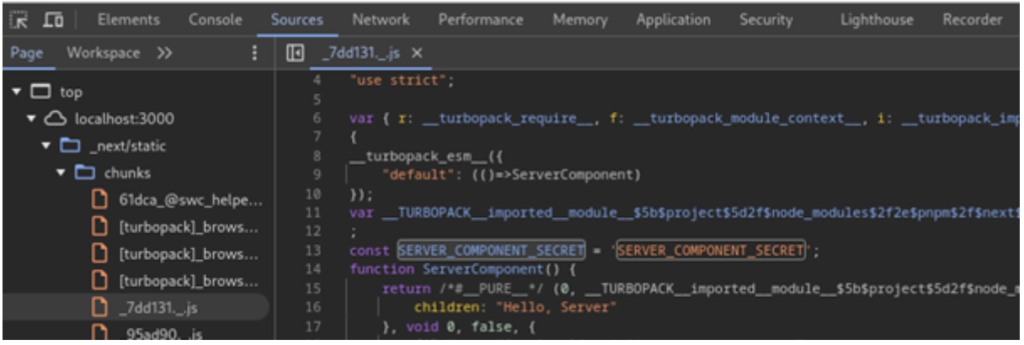
Let’s change our code slightly – let’s define Server Component (servercomponent.tsx) and import it into a Client Component:
// /app/test/page.tsx code

'use client'

import ServerComponent from "../js/servercomponent";

export default function Anything({ }: { }) {
 const name = 'anything'
 return(<ServerComponent/>)
}

// /app/utility/servercomponent.tsx code
const SERVER_COMPONENT_SECRET = 'SERVER_COMPONENT_SECRET'

export default function ServerComponent(){
    return(<div>Hello, Server</div>)}
Loading a Server Component in a Client Component file caused it to be treated as a Client Component, even without the “use client” directive explicitly, unintentionally exposing our secret once again:
The solution to avoid exposing secrets to the client is simple: create a .env file in your application’s directory, declare your variables, and reference them through process.env in your Client Component. This ensures that the variable’s value remains hidden, as environment variables are accessible only in the server-side environment. Consequently, they are not included in the JavaScript client bundle.
Additionally, to ensure that your server-side code (such as declared in serverComponent.tsx) is not exposed, use the import ‘server-only’ declaration at the top of the file. This will keep the code secure on the server and throw an error if part of it is used within a Client Component.
Note that if you want to make your environment variable accessible on the client side intentionally, declare it with the NEXT_PUBLIC prefix (e.g., NEXT_PUBLIC_SECRET=PUBLIC). This will embed the value of the environment variable directly into the JavaScript bundle sent to the client and replace all references to process.env.variable with the defined value.
#3 CORS misconfigurations
The middleware component is a common feature that allows you to run code before or after a request is completed – you can intercept, modify, and control requests and responses, perform authentication and authorization tasks, and many others – including configuration of the CORS mechanism. Let’s look at the following middleware.ts file:
export function middleware(request: NextRequest) {
  const allowedOrigins = [
    "https://securing.pl",
    "https://securing.biz",
  ]
  const origin = request.headers.get("Origin")

  const response = NextResponse.next()

  if (allowedOrigins.includes(origin || "")) {
    response.headers.set("Access-Control-Allow-Origin", origin || "")
    response.headers.set(
      "Access-Control-Allow-Methods",
      "GET, POST, PUT, DELETE, OPTIONS"
    )
    response.headers.set(
      "Access-Control-Allow-Headers",
      "Content-Type, Authorization"
    )
    // If credentials are needed:
    response.headers.set('Access-Control-Allow-Credentials', 'true');
  }
  // Handle preflight requests
  if (request.method === "OPTIONS") {
    return new Response(null, {
      status: 204,
      headers: response.headers,
    })
  }

  return response
}
This configuration designates securing.pl and securing.biz domains as trusted origins. Now, send an HTTP request to the root path:
GET / HTTP/1.1
Host: localhost:3000
Origin: https://securing.pl
[...headers...]
The HTTP response contains Access-Control-Allow-Origin (ACAO) header with securing.pl value:
HTTP/1.1 200 OK
access-control-allow-credentials: true
access-control-allow-headers: Content-Type, Authorization
access-control-allow-methods: GET, POST, PUT, DELETE, OPTIONS
access-control-allow-origin: https://securing.pl
[...headers...]
Content-Length: 47679

<!DOCTYPE html>
[...body...]
Sending an HTTP request from an untrusted Origin, such as anything.pl, results in the absence of ACA* headers. Example HTTP request:
GET / HTTP/1.1
Host: localhost:3000
Origin: https://anything.pl
[...headers...]
This time, the server didn’t send ACAO header at all.
However, it is possible to configure the CORS mechanism separately for a specific route, as shown in the code for the GET /api/test method:
// /app/test/api/route.js

export async function GET(request) {
    const origin = request.headers.get("origin") || ""; // Get the origin from the request

    return new Response(JSON.stringify({ data: "data" }), {
        status: 200,
        headers: {
            "Access-Control-Allow-Origin": origin, // Reflect the Origin header
            "Vary": "Origin",
            "Access-Control-Allow-Methods": "GET, POST, PUT, DELETE",
            "Access-Control-Allow-Credentials": "true"
        },
    });
}
The code above has higher priority than this defined in the middleware.ts. It mirrors the Origin value from the HTTP request, meaning every Origin will be treated as trusted:
GET /test/api HTTP/1.1
Host: localhost:3000
Origin: https://anything.pl
[...headers...]
The response includes anything.pl domain in ACAO header:
HTTP/1.1 200 OK
access-control-allow-credentials: true
access-control-allow-methods: GET, POST, PUT, DELETE
access-control-allow-origin: https://anything.pl
[...headers...]

[...body...]
When configuring CORS for a Next.js application, consider both the global settings and per-route configurations—if handling it on a specific route (or CORS at all) is even truly necessary. The potential misconfigurations related to CORS extend far beyond those discussed here. It is recommended to carefully review and test your CORS settings during development to avoid unexpected issues in production.
#4 Blind SSRF
Incorrect configuration of the next/image component can lead to a Blind SSRF vulnerability. This issue was thoroughly explored in the research Digging for SSRF in Next.js Apps, and – to be completely honest – it’s hard to explain the misconfiguration better than it was presented there by Assetnote team; I can only confirm – the redirection trick is still working by default. In this chapter, I will limit myself to highlighting the main insights:
Do not whitelist arbitrary domains using a wildcard (*). Instead, define trusted domains explicitly. Also, be aware that an open redirect in an application hosted on a trusted domain can also expose your application to Blind SSRF.
#5 Improper access control for Server Action
Server Actions in Next.js are functions that run asynchronously on the server side. Those can be called Client and Server Components to simplify form handling or data mutations. An example code for such an action might look like below:
'use server';
import postgres from 'postgres';
import { revalidatePath } from 'next/cache';
import { redirect } from 'next/navigation';
import { z } from 'zod';
[...]

export async function createInvoice(prevState: State, formData: FormData) {
  // Validate form using Zod
  const validatedFields = CreateInvoice.safeParse({
    customerId: formData.get('customerId'),
    amount: formData.get('amount'),
    status: formData.get('status'),
  });

  // If form validation fails, return errors early. Otherwise, continue.
  if (!validatedFields.success) {
    return {
      errors: validatedFields.error.flatten().fieldErrors,
      message: 'Missing Fields. Failed to Create Invoice.',
    };
  }

  // Prepare data for insertion into the database
  const { customerId, amount, status } = validatedFields.data;
  const amountInCents = amount * 100;
  const date = new Date().toISOString().split('T')[0];

  // Insert data into the database
  try {
    await sql`
      INSERT INTO invoices (customer_id, amount, status, date)
      VALUES (${customerId}, ${amountInCents}, ${status}, ${date})
    `;
  } catch (error) {
    // If a database error occurs, return a more specific error.
    return {
      message: 'Database Error: Failed to Create Invoice.',
    };
  }
  // Revalidate the cache for the invoices page and redirect the user.
  revalidatePath('/dashboard/invoices');
  redirect('/dashboard/invoices');
}
As you can see, there is no need to set up an API endpoint to invoke a Server Action – this will be created directly during Server Action execution. An example HTTP request with a Server Action called might look like this:
POST /dashboard/invoices/create HTTP/1.1
Host: localhost:3000
Content-Length: 504
Next-Action: 60344e743686735202b1d7d8cdb5a2ba161e7f837f
Next-Router-State-Tree: %5B%22%22%2C%7B%22children%22%3A%5B%22dashboard%22%2C%7B%22children%22%3A%5B%22invoices%22%2C%7B%22children%22%3A%5B%22createtest%22%2C%7B%22children%22%3A%5B%22__PAGE__%22%2C%7B%7D%2C%22%2Fdashboard%2Finvoices%2Fcreatetest%22%2C%22refresh%22%5D%7D%5D%7D%2Cnull%2Cnull%5D%7D%2Cnull%2Cnull%5D%7D%2Cnull%2Cnull%2Ctrue%5D
Accept: text/x-component
[...headers...]

[...body...]
The HTTP response that indicates the successful execution of an action may look as follows:
HTTP/1.1 303 See Other
Vary: RSC, Next-Router-State-Tree, Next-Router-Prefetch, Next-Router-Segment-Prefetch, Accept-Encoding
x-action-revalidated: [[],1,0]
x-action-redirect: /dashboard/invoices;push
content-type: text/x-component
X-Powered-By: Next.js
Content-Length: 114592
[...headers...]

1:"$Sreact.fragment"
[...body...]
Now look at the Next-Action header in the HTTP request. It is essential because its value corresponds to a specific Server Action. It turns out that the endpoint URL can be arbitrary, and the Server Action will still be executed as long as the Next-Action value is correct:
POST /anything HTTP/1.1
Host: localhost:3000
Content-Length: 504
Next-Action: 60344e743686735202b1d7d8cdb5a2ba161e7f837f
[...headers...]

[...body...]
The HTTP response – even though the server returns 404 Not Found – shows that the action has been executed:
HTTP/1.1 404 Not Found
Vary: RSC, Next-Router-State-Tree, Next-Router-Prefetch, Next-Router-Segment-Prefetch, Accept-Encoding
content-type: text/x-component
x-action-redirect: /dashboard/invoices;push
x-action-revalidated: [[],1,0]
X-Powered-By: Next.js
Content-Length: 114562
[...headers...]

1:"$Sreact.fragment"
[...body...]
Due to this specific behavior of the framework, if you want to restrict the execution of a Server Action only to authenticated users or those with a specific role in the application, authorization should be handled directly in the code rather than by blocking access to a given endpoint using a reverse proxy or middleware component as this may be easily bypassed.
CVE-2023-48309 Authentication bypass in NextAuth.js
Next.js does not come with a built-in solution for session management, authentication, and authorization. To implement these, you need to write your own logic or use one of the compatible libraries, such as NextAuth.js. Although using a compatible library is likely to be a less risky option, you still need to be aware of the risk of potential zero-day vulnerabilities.
Over one year ago, during testing for one of our clients, I discovered a way to bypass authentication in a Next.js application, allowing users to log in as anonymous users and, consequently, gain complete access to the application, which was critical vulnerability in this case.
While going through the ‘Sign in with Google’ flow in the tested application, I noticed that both before logging in and after completing the login process, the user receives a JWT token. I thought – what if I used the token before logging in the same way as the token the user receives after logging in? What if the application checks the signature and validity of the token but doesn’t verify whether the token is associated with a specific user? I decided to use the pre-login token as a session token, and it turned out that I successfully gained access to the application.
Following a conversation with the application developers, we found that the issue wasn’t in their code – it was a zero-day vulnerability in the NextAuth.js library, which was responsible for handling authentication in the application.
The vulnerability was discovered in November 2023 and patched in NextAuth.js v4.24.5 one week after the discovery.
Proof-of-Concept
1. Access the Application:
Navigate to http://localhost:3000 in your browser. The application will redirect you to the Login Panel.
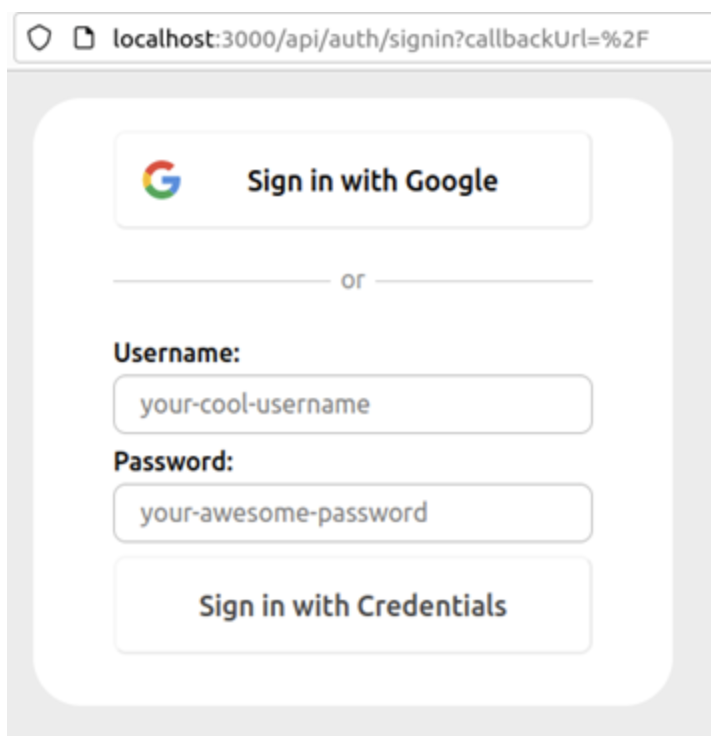
2. Initiate Google Sign-In:
Click on the Sign in with Google button. This action redirects you to Google’s authentication page.

3. Analyze Cookies:
Navigate to http://localhost:3000 again, then open the Storage tab in Developer mode (CTRL+SHIFT+I in Mozilla Firefox).
In the Storage section, check for new cookies, especially next-auth.pkce.code_verifier and next-auth.state.

4. Manipulate Cookie Names:
Rename either the next-auth.pkce.code_verifier or next-auth.state cookie to next-auth.session-token.

5. Bypass Authentication:
Refresh http://localhost:3000 in your browser. With the modified cookie, you should be able to bypass the authentication mechanism and gain unauthorized access to the application dashboard.

Bonus: CVE-2025-29927 Authorization Bypass in Next.js
During the writing of this article, inzo_ and zhero; discovered a critical vulnerability in Next.js that allowed complete bypass of authorization. The issue was related to the middleware component code (which I previously referenced in the context of describing CORS misconfigurations). They found that by using the x-middleware-subrequest header with a specific value, the middleware won’t process the request; instead, it will pass the request to the NextResponse.next() handler – right to its destination, skipping authorization. If you want to know more, refer to zhero;’s publication for a detailed analysis.
Key takeaways
I’ve demonstrated that ensuring the security of your Next.js application is still essential. No matter the framework, secure development practices should always be among the top concerns. Below are my recommendations to help you enhance your Next.js application’s security:
- Always sanitize and validate user input to prevent injection vulnerabilities. If you want to use a dangerous functions such as dangerouslySetInnerHTML, think twice and ensure proper data cleaning, for example, by using DOMPurify library.
- Be cautious with the code you define in Client Components. Use environment variables to avoid exposing secrets and use the import server-only declaration to protect sensitive code from leaking into the client bundle.
- Pay attention to discrepancies between global and route-specific CORS configurations.
- For Blind SSRF protection, avoid whitelisting all domains (e.g., using a wildcard) in the Image component. Keep in mind that potential open redirects in whitelisted domains can also be exploited through this vulnerability.
- Ensure proper authorization for executing Server Actions. Don’t rely on blocking access to a specific route.
- Keep your Next.js version and dependencies up to date to ensure protection against known vulnerabilities. Regularly monitor the framework version and all related dependencies. Be aware of the risk of potential zero-day vulnerabilities.
Connect with our AI Expert on LinkedIn!