
Key aspects of secure networking on iOS
More and more developers have become aware of the need for secure networking. However, we still see programs that use unencrypted HTTP on occasion. This article is all about secure networking on iOS.


Key aspects of secure networking on iOS
TL;DR
- Stop using HTTP, use HTTPS.
- App Transport Security exceptions shouldn’t be set on production environments.
- If you use third party networking libraries, verify the secure connection.
- For high risk applications, use certificate pinning.
- Always follow good mobile application development practices -> see our Guidelines on mobile application security – iOS edition.
Context
Most applications on our mobile devices talk with a backend. Offline applications are rarely used and even if there is no need to login, there is usually a need to have at least analytics. We wish there was no need to say that – because networking seems to be pretty obvious – but it’s not uncommon that apps make insecure connections. During pentests, from time to time we observe applications that use plain-text HTTP communication to transmit user’s credentials. This article will show you from the very beginning how to implement secure networking on iOS and what should be avoided.
Forbidden HTTP communication on iOS
Using HTTP in your application means that all the data you send is not encrypted. In other words, any attacker in a privileged network position may retrieve the information your app has sent. It also means that if your app’s user connects to a public hotspot, any person will be able to sniff that traffic. HTTP is purely outdated, do not use it. Starting from iOS 9, developers who want to use HTTP have to set a proper App Transport Security exception. You will read more on that later. To present you a proof of concept, we have created a simple Swift application.
This application sends a supplied login and password to http://securing.biz. Let’s take a look at the code below:
import Foundation

let url = URL(string: "http://www.securing.biz")!
func performLogin(login: String, password: String) -> Void {

   let session = URLSession.shared
   var request = URLRequest(url: url)
   request.httpMethod = "POST"
   let parameters = "login=\(login)&password=\(password)"
   request.httpBody = parameters.data(using: .utf8)

   let task = session.dataTask(with: request, completionHandler: { data, response, error in
       if let receivedData = data {
           print("\(receivedData)")
       }
   })
   task.resume()
}
It uses a standard URLSession.shared singleton and sends a HTTP request. As we have mentioned earlier, this code will fail as we didn’t set the required exceptions. So, we opened the Info.plist file and added the following XML code:
<key>NSAppTransportSecurity</key>
<dict>
   <key>NSExceptionDomains</key>
   <dict>
       <key>www.securing.biz</key>
       <dict>
           <key>NSExceptionAllowsInsecureHTTPLoads</key>
           <true/>
       </dict>
   </dict>
</dict>
The code is self-descriptive. It allows the app to initiate HTTP loads. You can read more about the exceptions in the official docs.
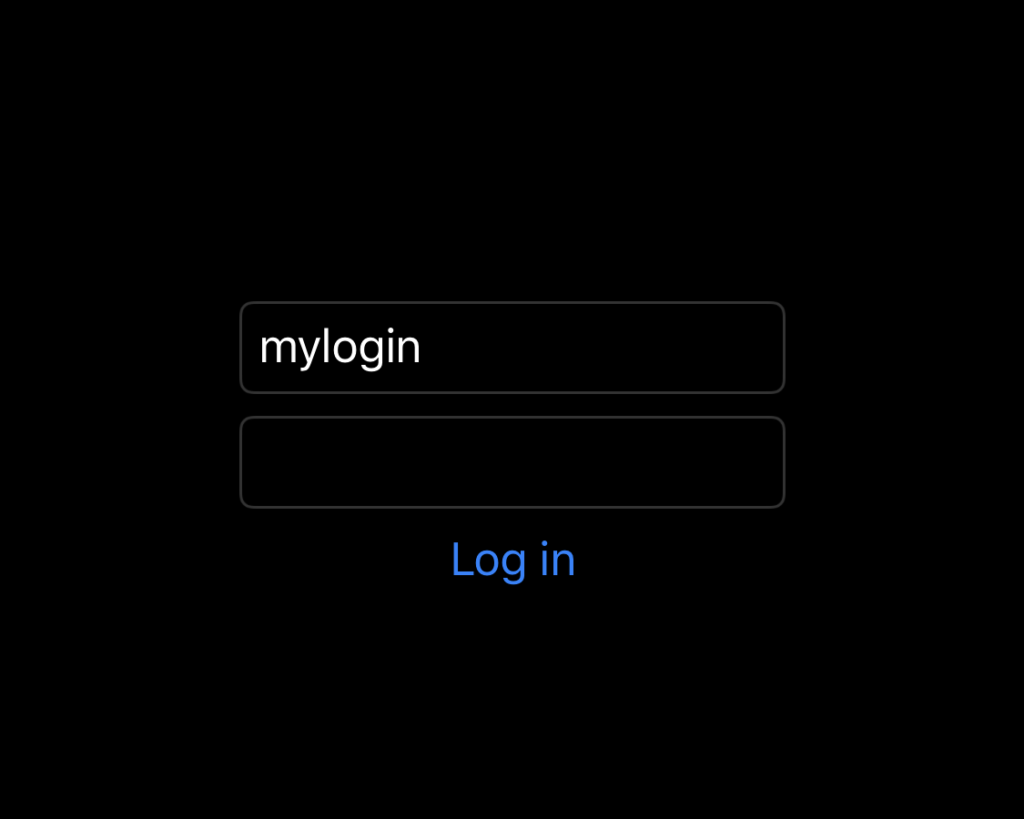
The Info.plist file is a good place to verify if the application conforms to best practices. Before deploying your application on production, search for App Transport Security exceptions. Returning to the application, we compiled it and installed it on the device. In order to sniff the traffic, we had to be in the privileged network position. The easiest way to do this on macOS is to open a personal hotspot in the Sharing options. So we did and connected the iPhone to our Wi-Fi. Then, we opened Wireshark and started sniffing the hotspot’s interface. After we supplied the login and password, we clicked the “Log in” button. In the Wireshark we observed the traffic.
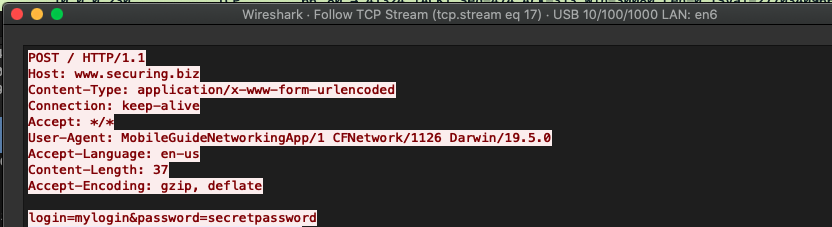
As you can see, the credentials were sniffed. Please keep that in mind and forget about HTTP in production applications.
HTTPS communication – the correct way
This protocol provides encrypted communication. There are some traps on the server’s configuration, but we will not discuss it in this article. We will focus on iOS applications. Developers usually select third party networking libraries in HTTP communication. It is more convenient, but also creates new risks. AFNetworking, a popular library, allowed a Man-In-The-Middle attack in version 2.5.1 when the application didn’t use the certificate pinning. So, when you decide to use external networking sources, verify the networking attack scenarios in order to be sure you do not expose your customers to risk.
As the intention of this article was to be practical, we will do networking with one of the most popular Swift libraries – AFNetworking. If you have any questions about networking implementation with the use of standard Apple’s API, feel free to contact SecuRing.
Let’s replace the previously introduced performLogin function with a new one:
func performLoginWithAlamofire(login: String, password: String) -> Void {
   struct Parameters: Encodable {
        let login: String
        let password: String
    }

   let parameters = Parameters(login: login, password: password)
   AF.request(url,
              method: .post,
              parameters: parameters,
              encoder: URLEncodedFormParameterEncoder.default).response { response in
               print("ALAMOFIRE \(response)")
   }
}
In the meanwhile, we opened BURP Suite, an HTTP(S) proxy and modified the proxy settings on our iPhone to point to the BURP’s IP and port. When we clicked the “Log in” button, nothing happened. However, the BURP showed an error message:

Now we confirmed that the application refused connection to our proxy server as the server was not able to provide a trusted SSL certificate for the securing.biz domain. But what if one of the Certificates Authorities gets compromised and the attacker is be able to create such a trusted SSL certificate? Or what if the attacker somehow installed a trusted SSL certificate on the victim’s device? Here comes the “certificate pinning” technique to prevent such a scenario.
Certificate Pinning on iOS devices
Certificate pinning is a technique that protects against connecting to your domain using SSL certificates other than your own. The mechanism can be implemented in several ways. The most popular are: pinning the whole certificate, server’s public key or pinning the cryptographic hash of the certificate. You can read more about certificate pinning in OWASP documentation.
The example below shows how we implemented certificates pinning in our sample application using the Alamofire:
import Alamofire

let url = URL(string: "https://securing.biz")!

class NetworkManager {
   static let shared: NetworkManager = NetworkManager(url: url)
   let manager: Session

   init(url: URL) {
       let configuration: URLSessionConfiguration = URLSessionConfiguration.default
       let evaluators: [String: ServerTrustEvaluating] = [
              "securing.biz": PinnedCertificatesTrustEvaluator()
       ]
      let serverTrustManager: ServerTrustManager = ServerTrustManager(evaluators: evaluators)
      manager = Session(configuration:configuration, serverTrustManager: serverTrustManager)
   }
}

func performLoginWithAlamofireAndCertificatePinning(login: String, password: String) -> Void {

   struct Parameters: Encodable {
        let login: String
        let password: String
    }

   let parameters = Parameters(login: login, password: password)
   NetworkManager.shared.manager.request(url,
              method: .post,
       parameters: parameters,
       encoder: URLEncodedFormParameterEncoder.default).response { response in
           print("ALAMOFIRE \(response)")
   }
}
So, we implemented a NetworkManager singleton class that specifies the pinning policy to the whole SSL certificate we placed in the app’s resources (DER formatted). Alamofire will load that certificate automatically. Then, we created a shared manager Session object that is then used to perform the HTTP connection.
We installed the application on the device. In order to verify if the certificate pinning works correctly, we also installed a SSL certificate and added it to the trusted CA’s. After clicking the “Log in” button, the BURP suite again showed the error:

That behavior proves that the pinning worked as expected. Our connection is now immune to an attacker who will not present our SSL certificate.
Summary
Secure networking awareness is growing from year to year. More and more applications are compliant with the best practices. However, sometimes we observe applications that use unencrypted HTTP. Apple also tries to prevent such insecure practices with the App Transport Security Mechanism. As we showed in this article, it may be harmful to the users. The HTTP should no longer be used in production environments. Using HTTPS is a proper way, however it also comes with the risk of trusting invalid certificates. We always recommend testing the basic SSL substitution scenarios to be sure that an application is well written. Some of you may be also interested in implementing the certificate pinning mechanism for high risk applications. We hope the knowledge shared in this article will help you create secure iOS applications.
It is also important to adhere to best practices during the iOS application development process. We have prepared a guide that collects our iOS security experience in one place. You can access it below.

Also, feel free to reach me out. You can find me on Twitter on LinkedIn.
Head of Mobile Security