
Web Push Notifications and user-targeted attacks – our research
Web push notifications are very common – but also not always secure. In this article, you will discover why and how push notifications can be malicious.


Web Push Notifications and user-targeted attacks – our research
Web push notifications are something you either love or hate – some adore them for crisp offers and discount alerts from favored websites, while others find them excessively invasive and intrusive. In this article, I will delve into web push notifications and their potential user-targeted attacks.
Connect with the AI Expert on LinkedIn!

Pros & cons of Web Push Notifications
Web push notifications are getting more and more popular as they provide a new marketing channel that is much more effective than traditional e-mail and SMS newsletters. To subscribe for web push notifications, you need to select the Allow button when asked for permission – no e-mail address or phone number is necessary, making them easily compliant with GDPR regulations.
This is not the end of web push notifications advantages from the perspective of marketing strategies. Push messages can be fully personalized and adapted to users’ behaviors and preferences. They allow for real-time communication with users, no matter which website they are currently visiting. Web push notifications are server-side triggered, allowing them to be scheduled for specific times and dates, making them even more powerful. Importantly, even if some users miss some notifications (e.g., the browser is closed or the laptop is powered off), users can still receive them after launching their browser.
This makes web push notifications an invaluable marketing tool but can also turn them into a potential threat. Before we dig deeper into specific attack scenarios, let’s explore how web push notifications work and understand what distinguishes them from local notifications.
Local Notifications vs. Web Push Notifications
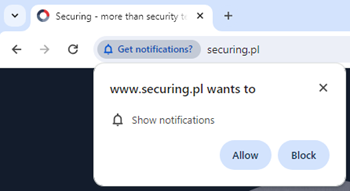
Local notifications are client-side triggered messages that utilize Notifications API. They don’t interact with the backend of applications, making notifications’ functionality quite limited. For example, let’s create a local notification on the www.securing.pl website using the browser console. In the beginning, we need to request the user’s permission:
Notification.requestPermission().then(status => {
console.log('Status', status)})
As a result, the user will be asked for permission on the current website:
Depending on whether permissions will be granted, it is possible to create a local notification with the following code:
if (status === "granted") {
    const notification = new Notification ("Securing, {
        body: "Example",
        icon: " https://www.securing.pl/eetsassy/2020/09/favicon.png"
})

notification.addEventListener('click', function(){
    window.open('https://www.securing.pl/?example');});}
When using Google Chrome and Windows 10, granting permissions on the www.securing.pl website will result in the following local notification:
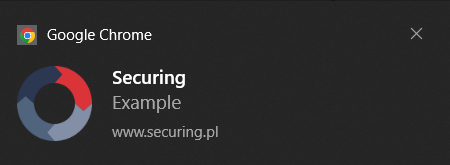
Clicking on the notification above will result in a redirect to https://www.securing.pl/?example page. Depending on your browser and its settings, redirection can occur directly or require additional actions.
As mentioned earlier, the local notification functionality is strictly limited and fully dependent on client-side JavaScript code. However, it is a different story when it comes to web push notifications that utilize Push API.
Note: You can try the code above on your own in the browser console.
How do Web Push Notifications work?
Web push notifications are more complex and much more powerful than you think. They make use of two APIs:
- Notifications API – used for displaying notifications, as described in the previous section,
- Push API – used for handling messages that are pushed to users from the server via push service (we will get into what it is).
The crucial part here is that Push API is implemented in a way that eliminates the necessity of directly invoking Notifications API’s methods and functions.
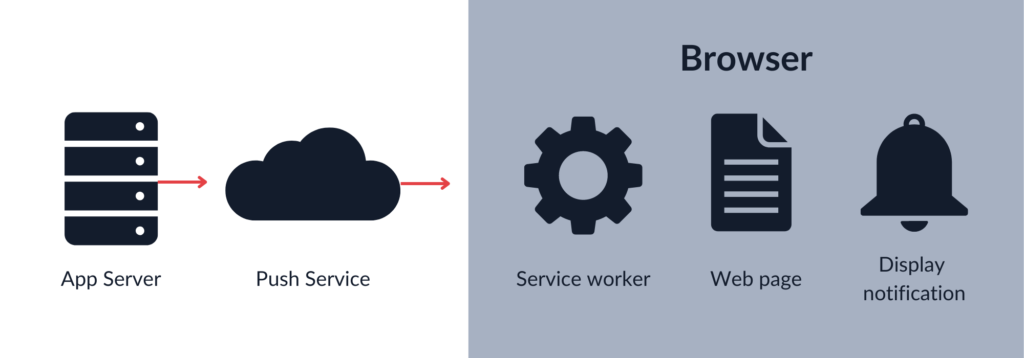
For a browser to receive push messages, the service worker must be active and registered. A service worker is a browser object that can execute JavaScript code separately from the main browser thread. Due to its autonomous way of working, service workers can be utilized for various tasks, including handling push messages.
With this knowledge, we can get into Push API details. Push API assumes the existence of three following parties:
- User – uses a browser to fetch the website, activate and register service worker, and subscribe to the push service. When a push message is received, the operating system notifies the browsers, and the listening service worker displays a notification.
- App server – serves the application, saves necessary subscription objects to send push messages, and sends web push notifications to the users via the push service.
- Push service – 3rd party provider that is used to send push messages from the app server to users.
For further understanding, let’s consider an example NodeJS application that consists of the following files:
- index.html – an HTML welcome page that loads main.js,
- main.js – a JavaScript file that registers the service worker, subscribes for Push notifications (gets the subscription object), and sends the subscription object for storage to the app server,
- worker.js – a listener that awaits push messages and displays notifications,
- index.js – the backend of the NodeJS application.
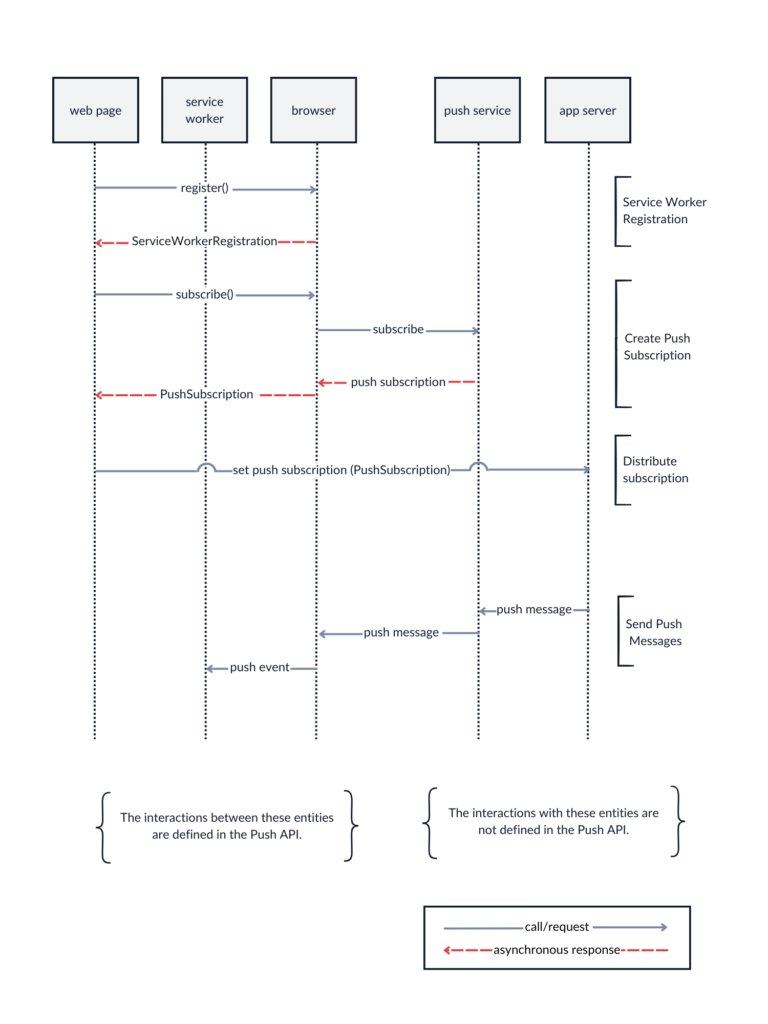
The complete flow leading to the displaying of web push notifications can be as follows:
- The user visits our example application and fetches the welcome page (index.html is served).
- The welcome page loads main.js.
- The browser executes main.js and then:
a. registers the service worker (worker.js) with the serviceWorker.register() method. The browser returns the serviceWorkerRegistration object.
b. subscribes to the push service with the PushManager.subscribe() method, called on the serviceWorkerRegistration object. In this step, the user is also asked to grant permissions.
c. Push service returns a subscription object that includes:
- Endpoint – a push service’s unique URL, different for each browser and user,
- ExpirationTime – expiration for this subscription, usually null,
- p256dh key – a public ECDH key for message encryption,
- Auth Key – a secret utilized for sending push messages from the app server to the push service.
The subscription object for the Google Chrome browser is presented as follows:
{
  endpoint: 'https://fcm.googleapis.com/fcm/send/{unique_string}',
  expirationTime: null,
  keys: {
    p256dh: '{public_ECDH_key}',
    auth: '{secret}'
  }
d. sends the subscription to the app server for storage with the callback request (e.g., fetch()).
- The app server saves the subscription object in, e.g., a database.
- The app server sends a push message to the user via the push service. It utilizes the subscription object saved in the previous step and then:
a. encrypts a push message using the p256dh public key,
b. sends the encrypted push message to the push service’s endpoint.
6. The service worker (worker.js) handles the push message (with addEventListener(‘push’, .) from the push service and displays the notification using ServiceWorkerRegistration.showNotification(.).
Below, you can find a diagram illustrating the steps:
This is a general overview of how web push notifications work; specific details may vary depending on, e.g., if the user is already subscribed or not.
Make Web Push Notification flow more secure with VAPID keys
There is still one more optional but important detail from a security perspective that needs to be explained – VAPID keys. Those keys are used to ensure that push messages are sent from an identified application by restricting subscriptions to a specific app server.
To use VAPID keys, we need to generate a public-private key pair first – in our example, we can use the Web Push library for NodeJS. Then, the newly generated public VAPID key must be utilized when subscribing to the push service (take a look at the 3b step in the previous section) and passed as a parameter in the PushManager.subscribe() method. This will bond the subscription object and VAPID keys together, so access to the subscription object data is no longer enough for sending a push message. Remember that the private VAPID key must be securely stored on the server side.
Now, it is possible to send push messages the subscribed users only when we can authenticate the app server to the push service with VAPID keys first. These keys must be included in the options object when sending push messages.
How to send Push Messages
There is no easier thing than sending push messages. All you need to do is to retrieve the user’s subscription and VAPID keys, create Push notification data, and just send it. You can do this easily with the Web Push library for NodeJS. Below, you will find an example JS script that you can use for testing purposes:
// Utilize Web Push library for NodeJS
const webpush = require('web-push');
// Declare VAPID variables
const publicVapidKey = '{your_public_key}';
const privateVapidKey = '{your_private_key}';
const reportingEmail = '{your_reporting_email}';
// Set VAPID details
webpush.setVapidDetails(reportingEmail, publicVapidKey, privateVapidKey)
// getSubscription from database
const pushSubscription =
{
  "endpoint": "{subscription_endpoint}",
  "expirationTime": null,
  "keys": {
    "p256dh": "{subscription_public_ECDH_key}",
    "auth": "{subscription_secret}"
  }
}
// Example Push notification data - title, body, icon, buttons, and redirects
const push_data = JSON.stringify(
  {title: 'Test Title',
  body: 'Test Body',
  // icon
  icon: "https://www.securing.pl/eetsassy/2020/09/favicon.png",
  actions: [
    {action: 'Button A', title: 'Button A'},
    {action: 'Button B', title: 'Button B'}
  ],
  url_a: "https://www.securing.pl/?button_a",
  url_b: "https://www.securing.pl/?button_b",
  url_else: "https://www.securing.pl/?else"},
  )
// Send Web Push message
webpush.sendNotification(pushSubscription, push_data).catch(err => console.error(err));
For a web notification to be successfully received, on the client side, there must be an active and registered service worker capable of processing data sent by the example JS script. Service worker code may look as follows:
//Push message receiving
self.addEventListener('push', e => {
    const data = e.data.json();
    self.registration.showNotification(data.title, {
        body:data.body,
        icon:data.icon,
        actions: data.actions,
        data:{
        url_a: data.url_a,
        url_b: data.url_b,
        url_else: data.url_else},
    });
});
// Add action when clicked
self.addEventListener('notificationclick', e => {
    const data_click = e.notification.data;
    // Redirect to url_a when clicking on the first button
    if (e.action === Object.values(e.notification.actions[0])[0]) {
        clients.openWindow(data_click.url_a);
    // Redirect to url_b when clicking on the second button
    } else if (e.action === Object.values(e.notification.actions[1])[0]){
        clients.openWindow(data_click.url_b);
    // Redirect to url_else when clicking somewhere else on the notification
    } else {
        clients.openWindow(data_click.url_else);
    }
},);
Web Push Notifications in different browsers and operating systems
Push API is available in Windows, *nix, and MacOS environments, as well as in major browsers, including Edge, Google Chrome, Mozilla Firefox, and Safari. UI/UX of push notifications may vary depending on a specific combination of browser and operating system you are using – see some examples below.
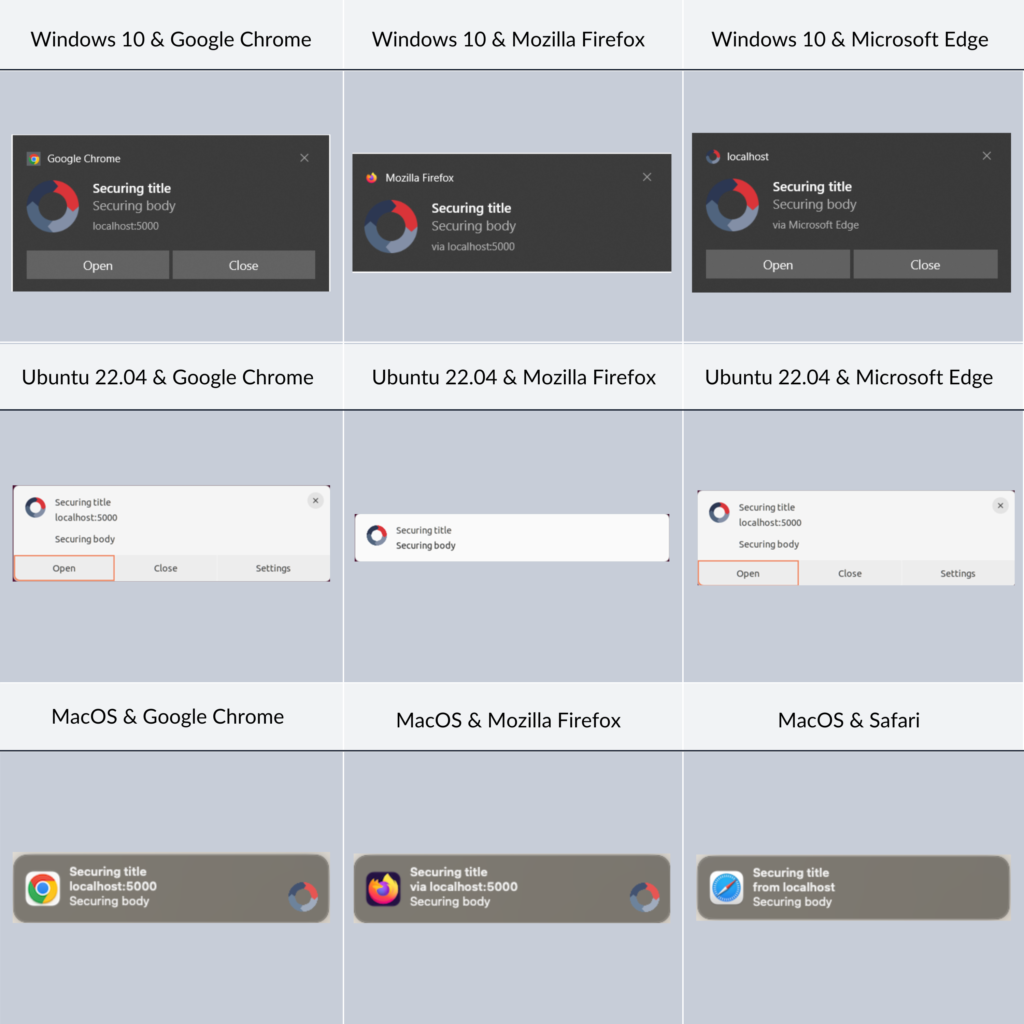
From a technical point of view, it is worth mentioning that each browser utilizes its own push service, affecting the endpoint’s domain within the subscription object:
| Browser | URL |
| Mozilla Firefox | https://updates.push.services.mozilla.com/wpush/v2/{unique_string} |
| Google Chrome | https://fcm.googleapis.com/fcm/send/{unique_string} |
| Microsoft Edge | https://wns2-am3p.notify.windows.com/w/?token={unique_string} |
| Safari | https://web.push.apple.com/{unique_string} |
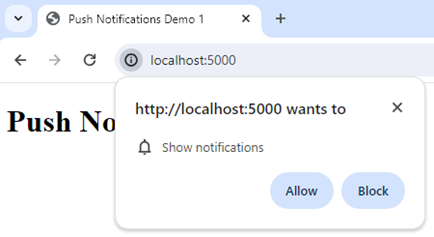
What is even more important, in the case of the Safari browser, it is not possible to display the permission prompt without a user gesture – the user must interact with the application (e.g., click on the button) before the application is allowed to ask for notification permissions:

Now that we have all the necessary information – let’s explore how threat actors could leverage Push API.
Web Push Notification attack examples
To present attack scenarios, we will use a locally hosted NodeJS application, Google Chrome browser, and Windows 10 OS.
Scenario #1: classic phishing attack
This situation is likely to happen if notification permissions are mistakenly granted on an unintended website. The initial step involves the victim clicking the Allow button:
If permissions are granted, the attacker can send personalized push notifications to the victim, for example:
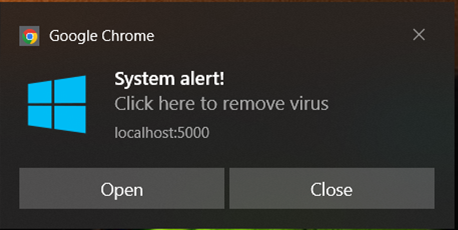
The attacker can define actions that are triggered by buttons, as well as clicking on the body of the notification itself – clicking the Close button may not necessarily mean closing the notification; instead, it can trigger redirection to the attacker’s domain:
As mentioned, the attacker can fully customize push messages, including their title, body, icon, buttons, and actions. This can be abused to increase the efficiency of the attack:
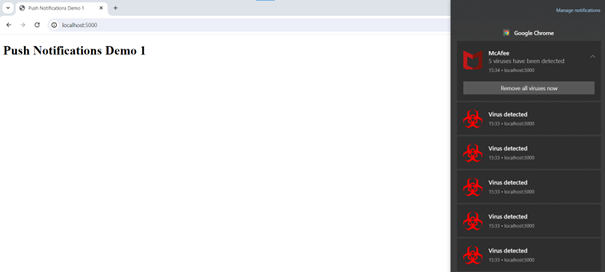
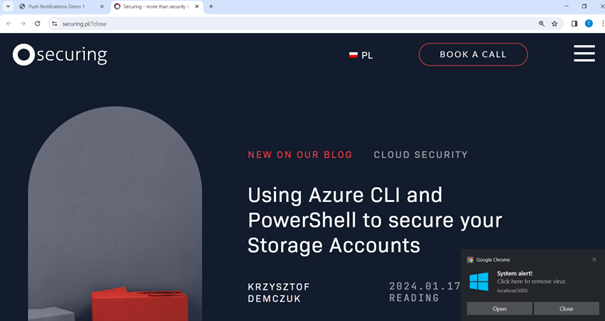
Scenario #2: bombing phishing attack
If you think that web push notifications cannot be intrusive and annoying, look at the example below:

In this scenario, the victim is bombarded with push messages after launching the browser. This may cause considerable confusion. In the case of accidentally clicking on the malicious notification, the victim will be redirected to a website defined by the attacker.
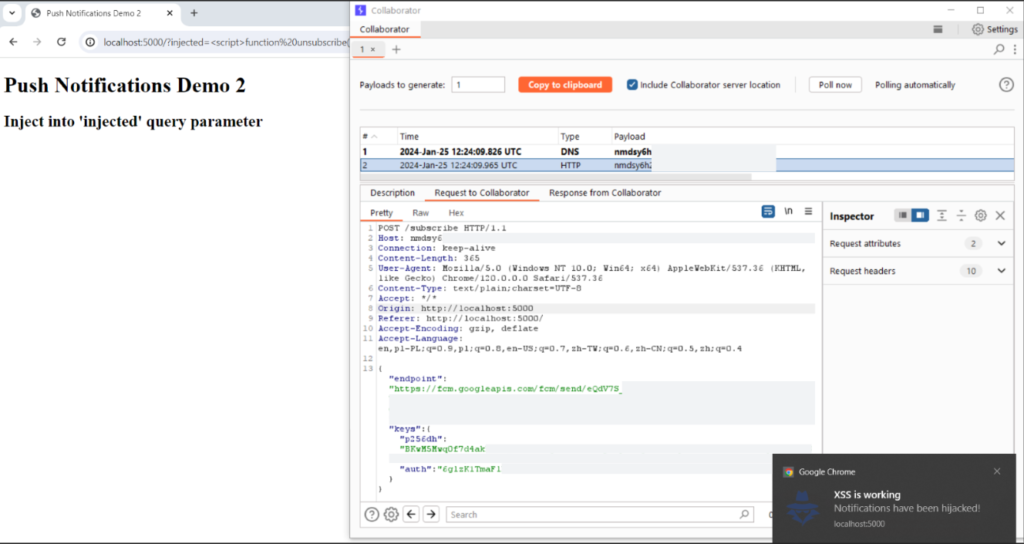
Scenario #3: Web Push Notifications hijacking through XSS vulnerability
Let’s assume that our local NodeJS application is a legitimate application for which the user has granted permission to send notifications. But what if this application is vulnerable to XSS, for example, in an injected parameter of a query string? The attacker can leverage this vulnerability to send their own notifications with the following payload:

In the initial step, the malicious code unsubscribes the current subscription and subsequently re-subscribes the user. To access the subscription object, the attacker can utilize the fetch() method and send it to the controlled domain. But how about VAPID keys, shouldn’t they protect the users in situations like that? When re-subscribing the user, the attacker can employ self-generated keys, making the application’s keys not applicable to a new subscription object. To ensure that the attacker’s resubscription will happen at the right moment (after the legitimate subscription), the attacker can utilize the setTimeout() function.
Real-world case studies of Web Push Notification attacks
There are numbers of real-world attacks where web push notifications have been used for malicious purposes. As KrebsonSecurity explained, allowing push notifications on PushWelcome-associated sites granted company’s advertising partners the ability to display content of their choice. This was clearly abused by advertisers, leading to misleading notifications. Subscribing PushWelcome’s push messages resulted in notifications falsely claiming virus infections detected by Norton and McAfee antiviruses – a quite improbable scenario on a newly installed Windows system.
Web push notifications can also be used as a part of more sophisticated phishing campaigns. As detailed in a VMware blog post, push notifications can be leveraged in the final stage of a phishing campaign to deliver fraudulent links to the victims. In this scenario, threat actors utilized PDF files featuring fake CAPTCHA images, persuading victims to click on the seemingly innocuous image. As a result, the users were redirected to a malicious website asking for permissions. Until the users were granted the necessary permissions for push messages, the notification permission pop-up was repeatedly appearing in a loop. After the victims finally allowed web push notifications, the attacker could easily send malicious push messages that sometimes included URL redirections to other malicious websites associated with drive-by-download and phishing attacks.
If your curiosity about web push notification attacks starts to grow, you can also explore Frank Angiolelli’s report on a large phishing campaign called PushBug. This report delves into technical details of how threat actors abused web push notifications and provides insights into Indicators of Compromise (IoC) associated with this campaign – including fraudulent domains and IP addresses.
Connect with the AI Expert on LinkedIn!

Push API – privacy and security concerns
As you probably noticed, Push API utilizes a 3rd party provider depending on the browser you use. This may raise legitimate concerns regarding the privacy of data transmitted in push messages. As W3 Push API documentation states, the contents of a push message are encrypted [RFC8291]. However, the push service is still exposed to the metadata of messages sent by an application server to a user agent over a push subscription. This includes the timing, frequency and size of messages. Although push messages are encrypted, it is still not recommended to use them for transmitting sensitive information. As for metadata, let’s delve into the following thread.
At the end of 2023, the issue of access to mobile push notifications by the U.S. government resonated widely. According to the Wired article, the United States government and foreign law enforcement can demand Apple and Google share metadata associated with push notifications from apps on iOS and Android. Despite this issue relating to mobile push notifications, concerns may also arise regarding web push notifications, as those also rely on push service providers.
Let’s revisit W3 Push API documentation for a moment, specifically the following part: There is no guarantee that a push message was sent by an application server having the same origin as the web application. The application server is able to share the details necessary to use a push subscription with a third party at its own discretion. This is a crucial part to highlight, as subscription objects and VAPID keys can be shared or even leaked. It is something worth remembering, much like in the case of Scenario #3.
How to protect ourselves against malicious Web Push Notifications
We are slowly approaching the end of this article, so it’s worth considering how to protect ourselves against the improper use of Push API. Based on this article, we can make the following conclusions:
- Obviously, don’t grant notification permissions on untrusted websites.
- If you have unintentionally granted permissions on such websites, revoke them as fast as possible.
- Review the list of applications with already granted notification permissions.
For example, in Google Chrome, you can navigate to Privacy and security -> Site settings -> Notifications. See documentation for Edge, and Mozilla. - Keep in mind that you may be bombarded with dramatic, pressing, and malicious notifications even from legitimate applications. Consider revoking permissions if you notice unusual content of a push message.
- If you have noticed that the push message contains sensitive information, revoke permissions for this application.