
Setting up your AWS Monitoring – Security tips
This article contains good practices of AWS Monitoring and Alerting configuration. We also showed a few real-world evasion techniques.


Setting up your AWS Monitoring – Security tips
AWS offers many services for different tasks, sometimes it even looks like multiple solutions try to solve the same problem. Choosing the right one could be challenging – that’s why I thought up about writing this article. It contains a little sum-up of the most important monitoring services offered by AWS, short guides on how to set them up, and as an addition – a few known evasion techniques collected in one place.
The content of this post may be updated with further services (or our research if new evasion techniques appear).
List of AWS services and evasion techniques covered in the article:
- Monitoring Services
- Budgets – manage your cost limits
- CloudTrail – watch over AWS API calls
- Config – inspect your configuration history
- GuardDuty – detect suspicious activity
- Terraform – create the services with one command
- Evasion techniques
- Cheating the GuardDuty
- PenTest Finding
- InstanceCredentialExfiltration Finding
- Cheating the GuardDuty
AWS Monitoring Services
Monitoring for Amazon Web Services is a collection of procedures for ensuring the security and performance of your AWS resources and data. To acquire, analyze, and communicate data insights, AWS relies on a variety of technologies and services.
I have listed these kinds of services further in this article. Information gathered by them may then be used to spot vulnerabilities and faults, detect indicators of compromise, and improve setups.
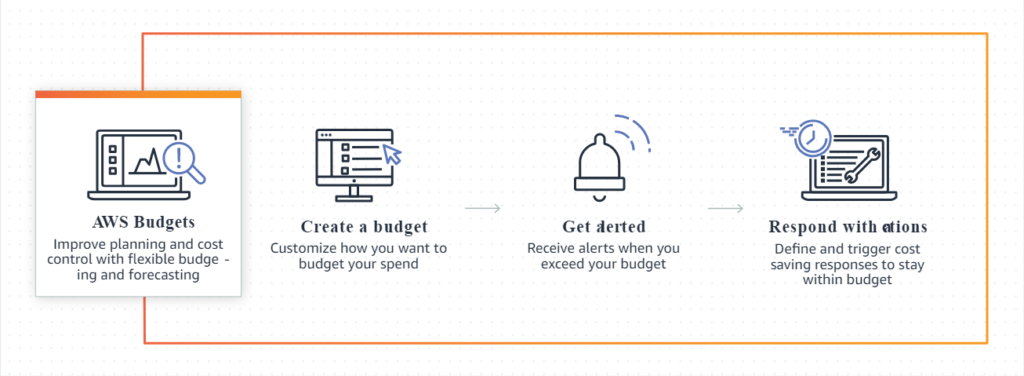
Budgets – manage your cost limits
AWS Budgets in the simplest words allows you to track your costs and the most important useful feature is setting a threshold that will automatically notify you by email or SMS when this limit will be exceeded.
Furthermore, creating a budget is free and more specifically, the first two action-enabled budgets are free (regardless of the number of configured actions). That should be enough for most of you, and I believe that 0.10 $ per day (for every next budget) won’t kill any company which needs more of them 😉
Why do I think it is necessary to configure at least one budget? Notifications about exceeding a limit could simply inform you that you forgot to disable some services, or that someone is trying to abuse your account!
There are a lot of threat actors who want to gain access to your AWS account just to set up as many biggest EC2 instances as possible to mine some cryptocurrencies – and the bill for that could be a real killer!
If You don’t believe me, look at this (already archived) article from 2017 which describes how little less than 5 days was enough to create a cost of nearly 100k USD.
How to configure AWS Budgets?
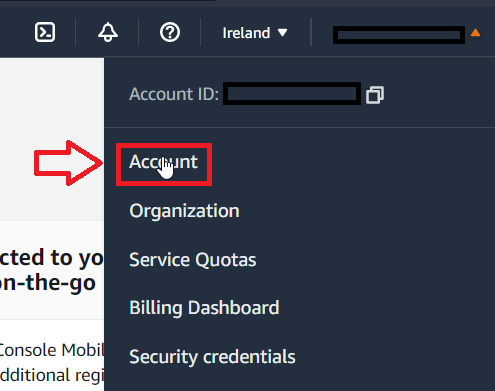
It is important to know that AWS Budgets are only accessible for root accounts by default, but it is possible to manage access to it using IAM permissions. To change it, you have to login as a root, go to the Account settings:
Then scroll down to the IAM User and Role Access to Billing Information section:
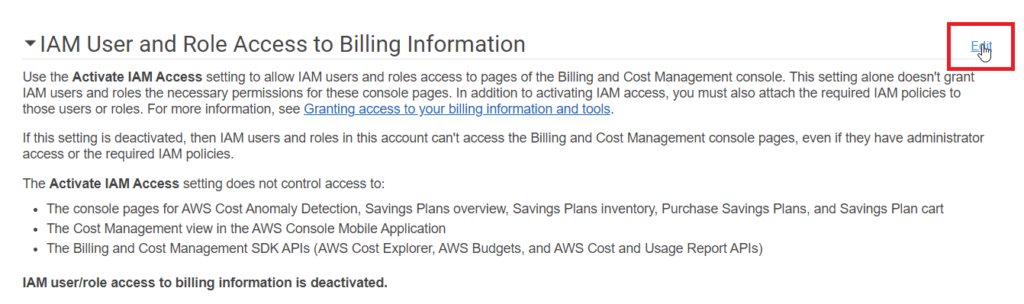
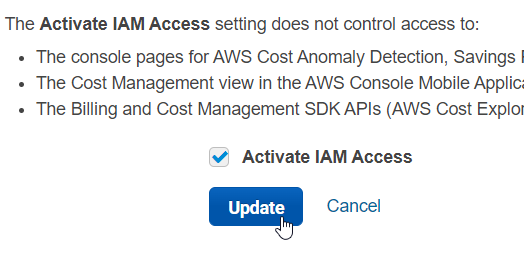
And change it to allow managing access by IAM:
Description of creating a budget from CLI could be too long for this article, as it requires creating a JSON file with details of the budget, so for now I will send you a link to relevant AWS CLI docs – description of create-budget call and create-notification.
Now, I’m going to describe the Console configuration of the Cost Budget.
Firstly, go to the AWS Budgets service and start the process with Create a Budget button. Choose Cost Budget. First configuration options are presented below:
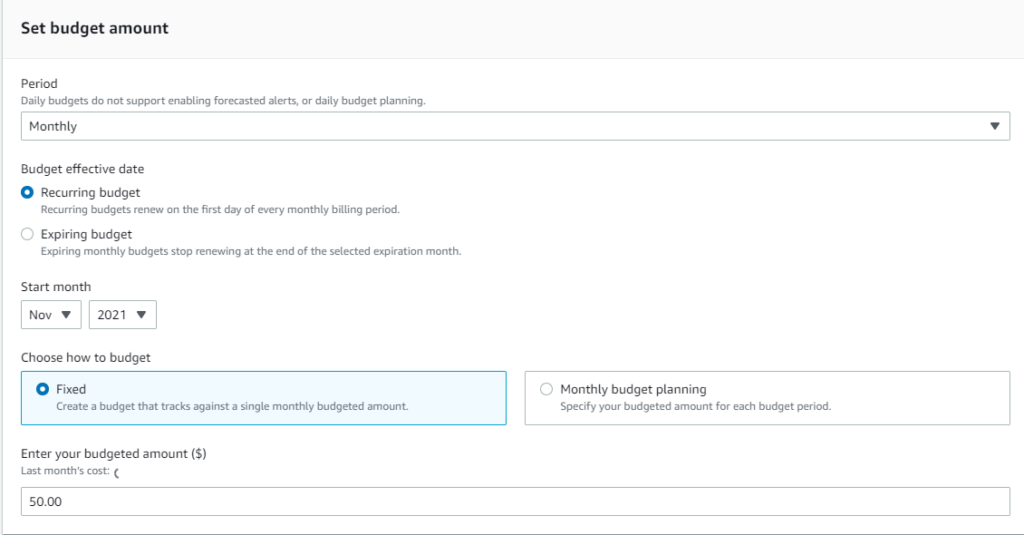
The next step is configuration of email notifications alerts.
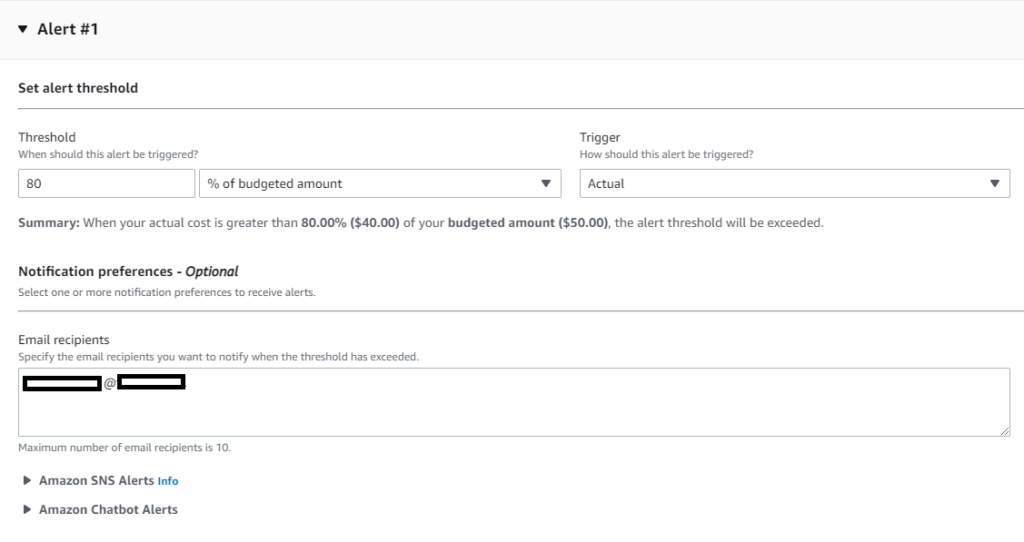
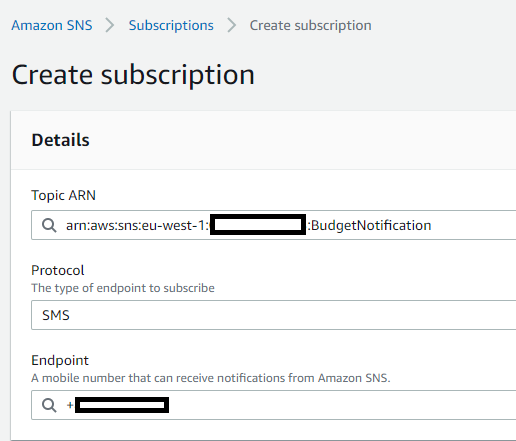
Or SNS alerts (which will allow SMS notifications):

To use SNS, you have to create Standard queue with the following Access Policy:
{
    "Version": "2012-10-17",
    "Statement": [
        {
            "Sid": "AWSBudgetsSNSPublishingPermissions",
            "Effect": "Allow",
            "Principal": {
              "Service": "budgets.amazonaws.com"
            },
            "Action": "SNS:Publish",
            "Resource": "<Budget_ARN>"
          }
    ]
}
Remember also to set up subscription to the topic, to actually get these alerts:
That’s all – basic Budget configuration is done.
Short sum up
Is it needed or recommended? Needed. It creates a possibility of early detecting an attack which tries to spawn cryptominers or do other costly operations.
How hard is it to implement? Subjectively – easy.
Price? Free (in most basic use cases).
CloudTrail – watch over AWS API calls
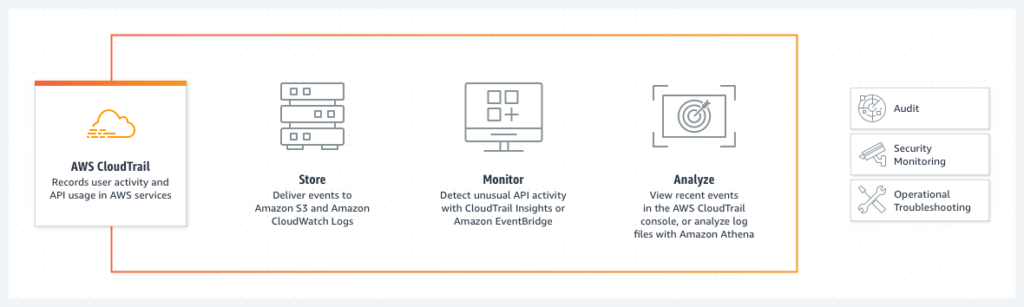
Is there any service that should be enabled by default as a first step when creating a new AWS Account? Yes – that’s a CloudTrail. It logs AWS API calls – basically that gives us information about everything that happens in our account:
- Who made an API call?
- When was the API call made?
- What was the API call?
- Which resources were involved in the API call?
- Where did the API call come from and where it goes?
Without CloudTrail, we won’t know if there is any suspicious activity on our account.
Furthermore, CloudTrail could be easily integrated with other AWS services. We can for example stream logs to the CloudWatch and create alarms for specific API calls or even define automatic actions, like running Lambda functions which will verify our configuration or try to limit someone’s actions.
It’s worth mentioning that there are some actions that aren’t logged by default, for example, S3 bucket read & write events or Lambda invocations. It’s possible to enable logging of them and that’s called Data Events, but it’s paid functionality. A little more about it could be found in AWS documentation here. It’s worth giving a thought on logging for example access to buckets with sensitive data.
How to configure CloudTrail?
Single account
Configuration on a single account is really quick and simple.
It could be done using cli with these commands:
aws cloudtrail create-trail --name [trail_name] --s3-bucket-name [bucket_name] --include-global-service-events --is-multi-region-trail --enable-log-file-validation --cloud-watch-logs-log-group-arn [cloud_watch_logs_group_arn] --cloud-watch-logs-role-arn [role_arn] --kms-key-id [kms_arn_or_alias]
aws cloudtrail start-logging --name [trail_name]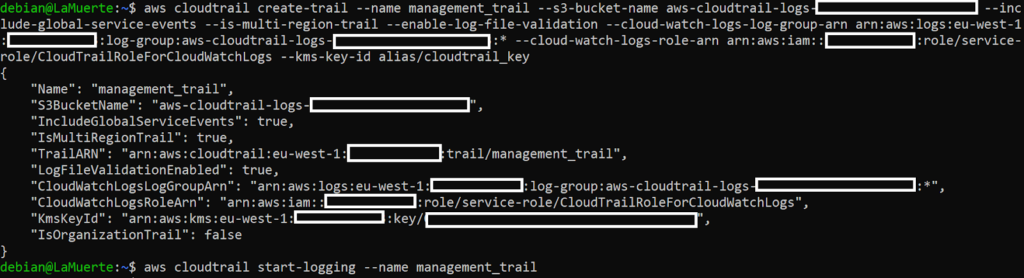
Any cons? You have to prepare S3 Bucket before running the command. Also if you want to encrypt the trail and stream it to the CloudWatch – encryption key, log group and correct role have to be also prepared beforehand.
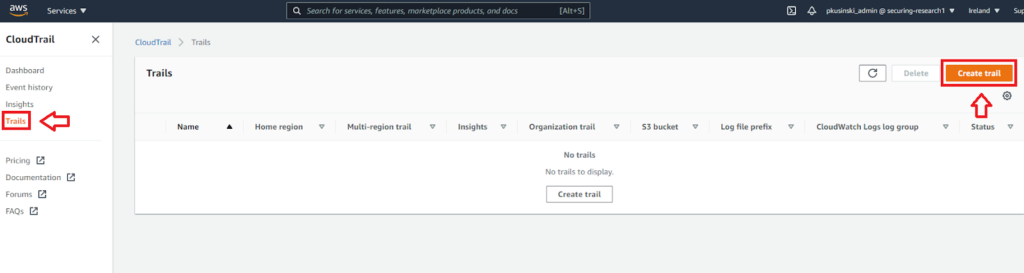
For a single account it would be easier to use the console as it creates all the needed resources during the process. In order to do that, navigate to the CloudTrail service and go to Trails, then click Create trail:
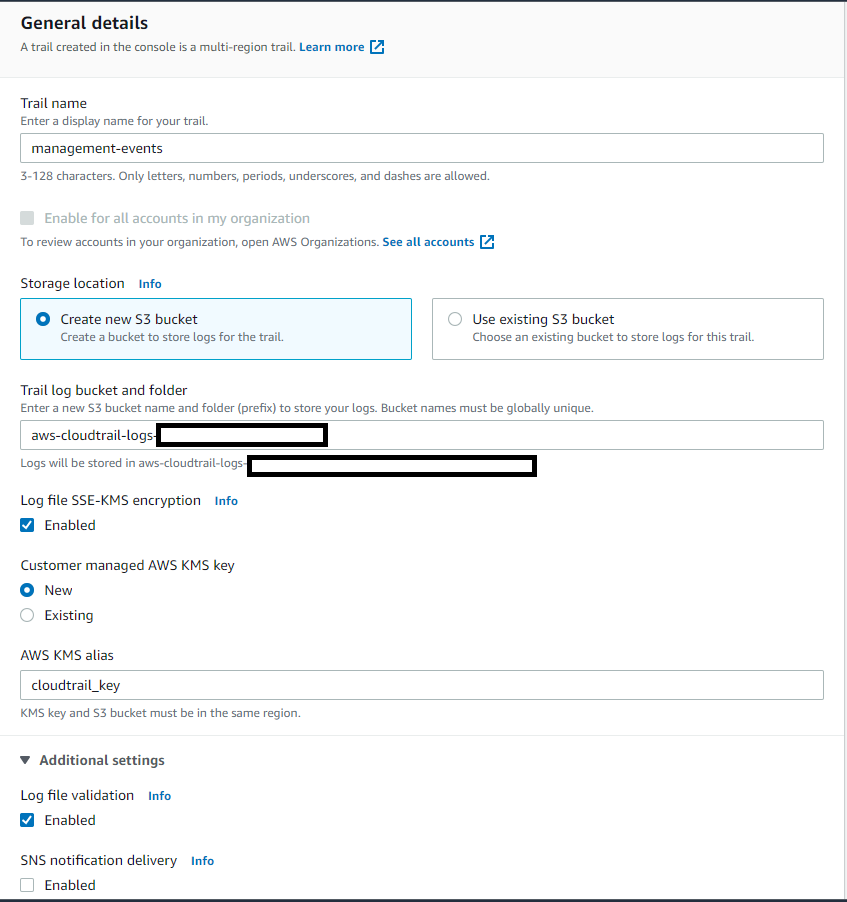
Then choose desirable options, for example:
It is also possible to configure CloudWatch Logs:
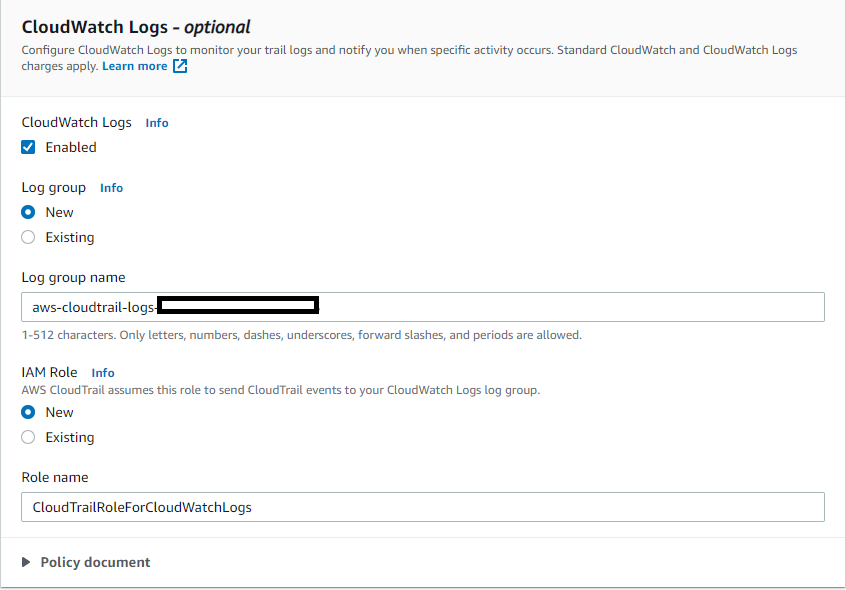
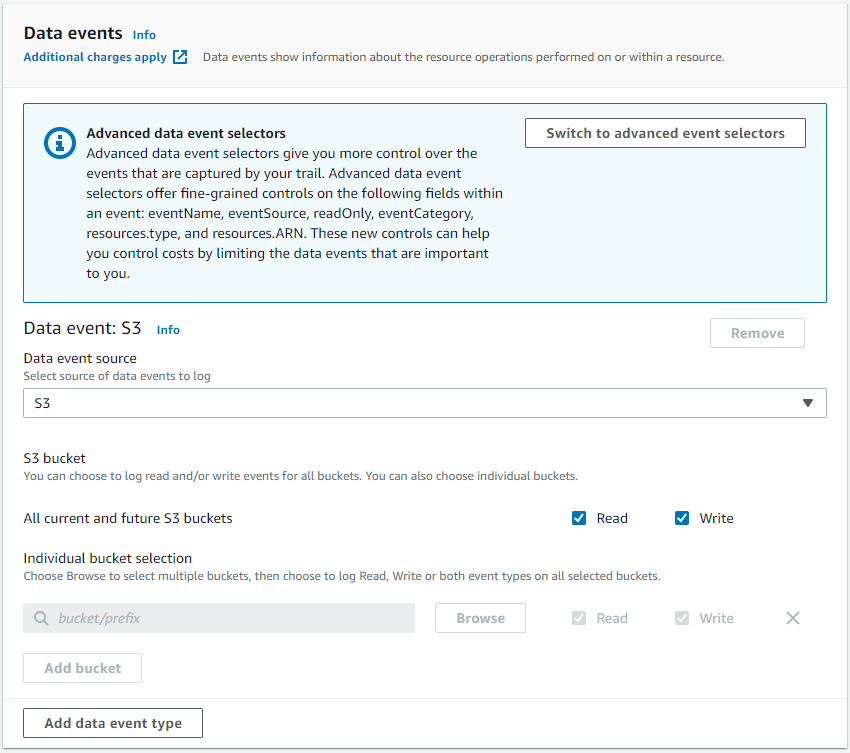
Second step would be configuring log events:

Important! By default, data events (e.g. S3 or DynamoDB read & write events, Lambda executions) aren’t logged. Also, keep in mind that those functionalities are paid. It can be configured during the second step:
And with that we created a new trail!
Short sum up
Is it needed or recommended? Definitely Needed. Without CloudTrail, we don’t know what’s going on within our account. Moreover, sometimes other services also make use of CloudTrail.
How hard to implement?
- Single account – easy
- Organization – medium (it is rather easy, but there could be some problems when doing it the first time with separate bucket on another account and with encryption)
Price? It depends – Single account and organizational trail, without data events would be free. Data events cost 0,10$ per 100k events. Every new trail would be billed 2$ per 100k management event.
Config – inspect your configuration history
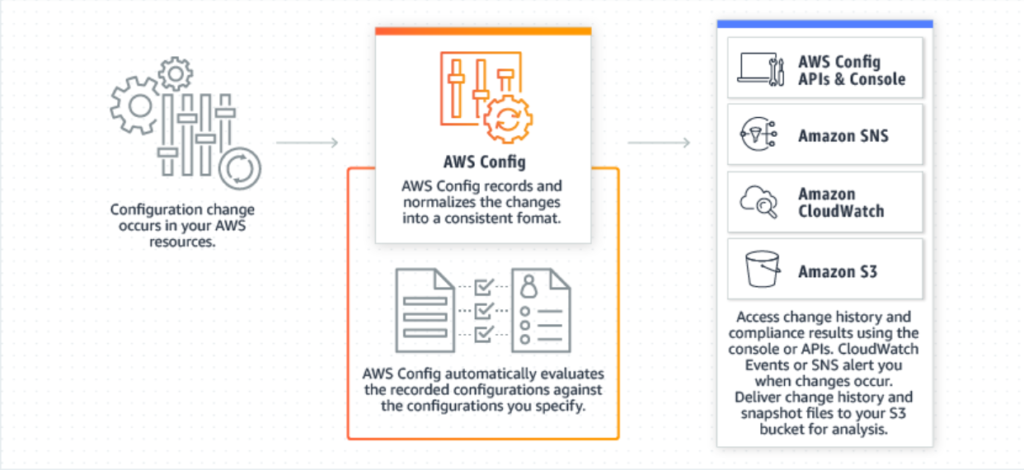
AWS Config is a great service not only from a security point of view but also for debugging/development purposes. The basic functionality of the Config is to record all of the configuration changes – it will create a history of every change for every recorded resource, for example, Security Group:
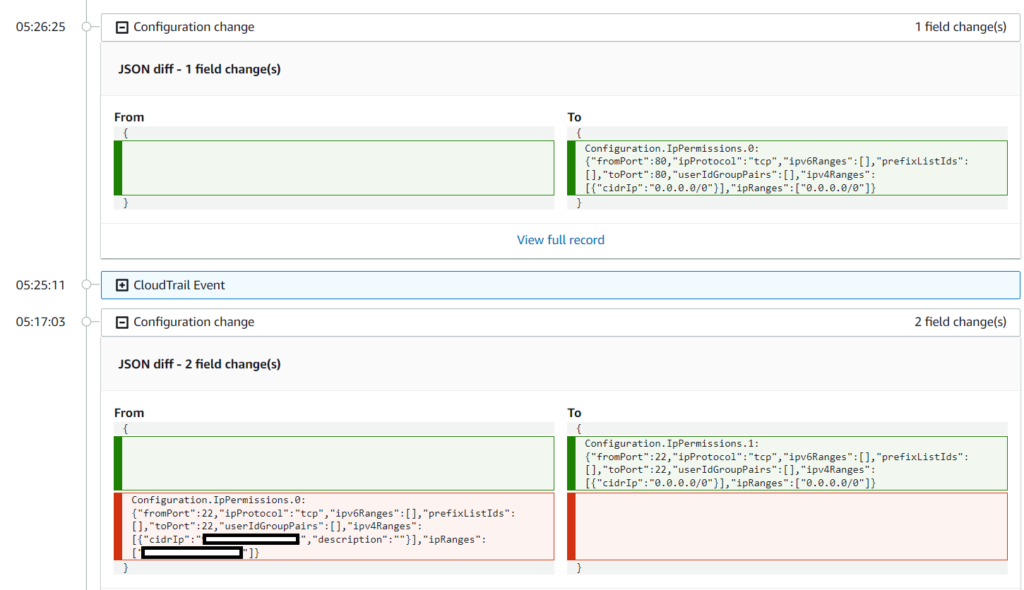
It has some delay before displaying the changes, so don’t worry if your Config won’t work immediately after modifying some resources.
Furthermore, there are Config Rules – their task is to monitor our resources for compliance. In case of detecting non-compliant resources (for example, users without MFA enabled) it would notify admins. It is possible to configure some automated actions in case of occurrence of these alarms – It may be used to change the configuration to the compliant one, or to delete it.
Worth mentioning is the fact that it is possible to create your own Config Rules using Lambda functions. There is also a whole Github Repository with rules created by the AWS community!
It is a nice option to have in case of forensics analysis – it will allow you to find every modified resource and find for example created backdoors.
How to set up AWS Config?
Single Account
There is an option in the Console for 1-click setup which creates a default AWS Config:
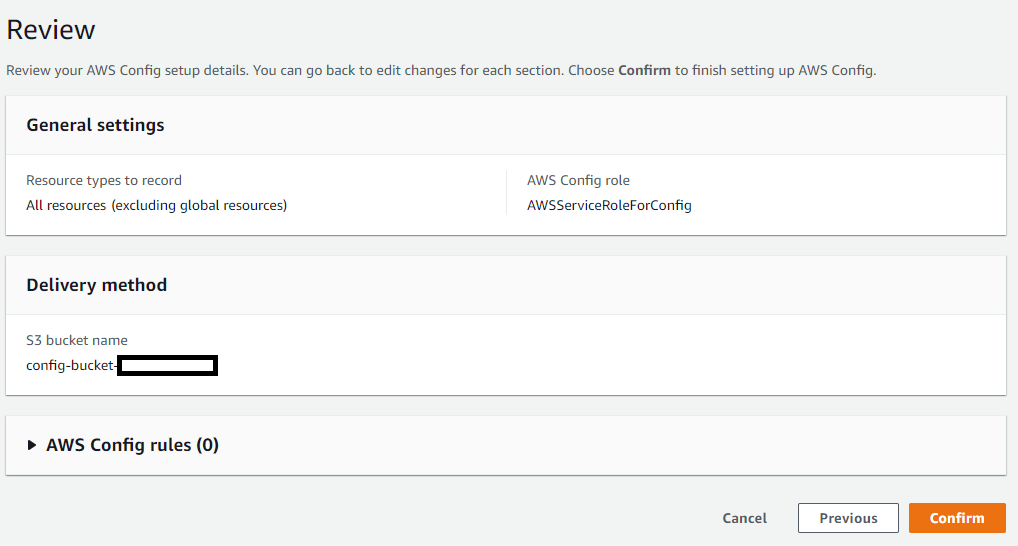
Alternatively, you can use Get started button with more advanced options:
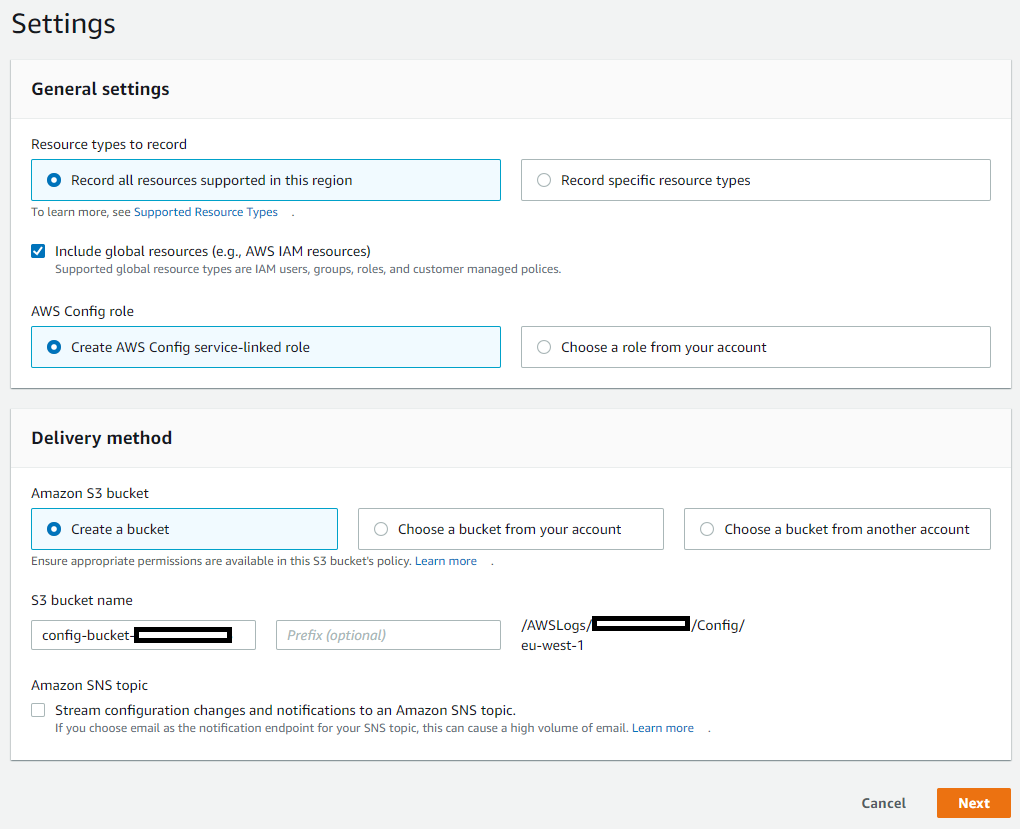
Remember, that AWS Config is a regional service – if you want to use it in a few regions, you have to set it up in every one of them.
Short sum up
Is it needed or recommended? Recommended to set up in every enabled region. Mostly forensic helper, but could also help to find created backdoors and other modified resources during the attack.
How hard to implement?
- Single account – easy
- Organization – medium/hard (AWS Config has to be configured in every region/account which we want to monitor, and then it’s possible to aggregate all of it in a single view in single account using aggregator)
Price? $0.003 per configuration item recorded + Rules per number of evaluations (details)
Because pricing of AWS Config is based on the amount of records, it is recommended to set up in every region! It should be free for unused regions, but in case of the attack, it gives visibility of changes done by an attacker in unused regions.
GuardDuty – detect suspicious activity
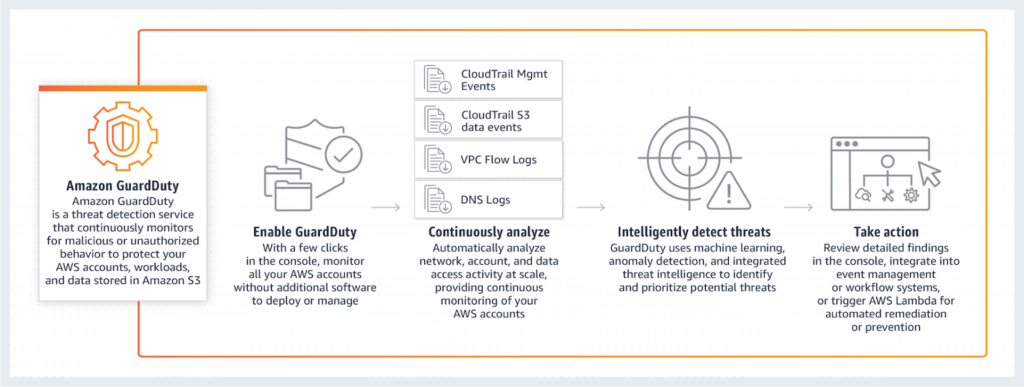
GuardDuty is one of the services which makes use of machine learning. It will analyze your logs from different sources (CloudTrail, Flow logs, and DNS logs) for default checks, like signs of compromise or connection to the known bad actor IP.
Where is machine learning in all of it? GuardDuty continuously tries to learn how you use your AWS account, which user or role does what. After some time of using it, it will start to notify you about suspicious activity – for example, if one of the users always uses only S3 API calls, but suddenly EC2 or IAM API calls are made, GuardDuty should notify you about it. It gives a possibility of finding a stealthy attacker in our infrastructure.
How to configure GuardDuty?
Single account
Probably one of the fastest instruction – using CLI:
aws guardduty create-detector –enable
And when using Console – goto the GuardDuty service, click Get Started! and then Enable GuardDuty – no additional configuration is required in basic situations. You can set additional things like allowlist of IPs which won’t set off GuardDuty alarms, but I’m leaving it to you for exploration!
Short sum up
Is it needed or recommended? Recommended to set up in every enabled region. Detector of suspicious activity or obvious indicators of compromise.
How hard to implement?
- Single account – easy
Price? Price is based on amount of analyzed logs (details)
In unused regions, there shouldn’t be any logs – because of that, GuardDuty won’t additionally charge you. In case of any unusual actions in unused regions, it could detect it and notify you about possible indicators of compromise.
Terraform – create the services with one command
I really like to use Terraform when it comes to managing cloud services. Nearly the whole infrastructure and labs for our Practical AWS Security Training are coded in it. That’s why I created a terraform script for deploying described services, as it is probably preferred over a CLI or Console configuration.
For now, it’s mainly for usage on a single account (I want to update it later together with this article). It could be used as a whole package, where setting terraform.tfvars gives you an option for fast configuration. It is also possible for you to copy single modules and modify them to your liking.
You can find the code 👉 here.
I’m also open to suggestions on how to make these scripts better! I was a self-learner with Terraform, and I used a few hacks to automate it as much as possible – if something could be done better, let me know (or maybe you will learn something from mine hacks ;)).
Evasion techniques in AWS
Threat actors utilize evasion techniques to escape detection by monitoring services. Attackers have two goals when taking over the cloud infrastructure: to be silent and stay lethal, to obtain as much as possible for as little effort.
Cheating the GuardDuty
PenTest Finding:
Using common penetration testing distributions, like Kali Linux, Parrot Linux or Pentoo Linux will be detected by GuardDuty and will trigger a PenTest Finding.
How is it done? If we will look up into the code of the botocore package (used by awscli), and more precisely into session.py code, we can find this fragment of the code:
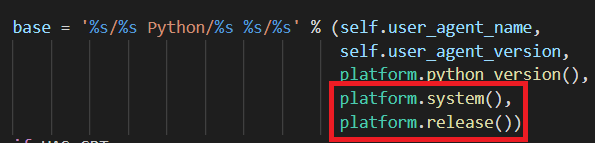
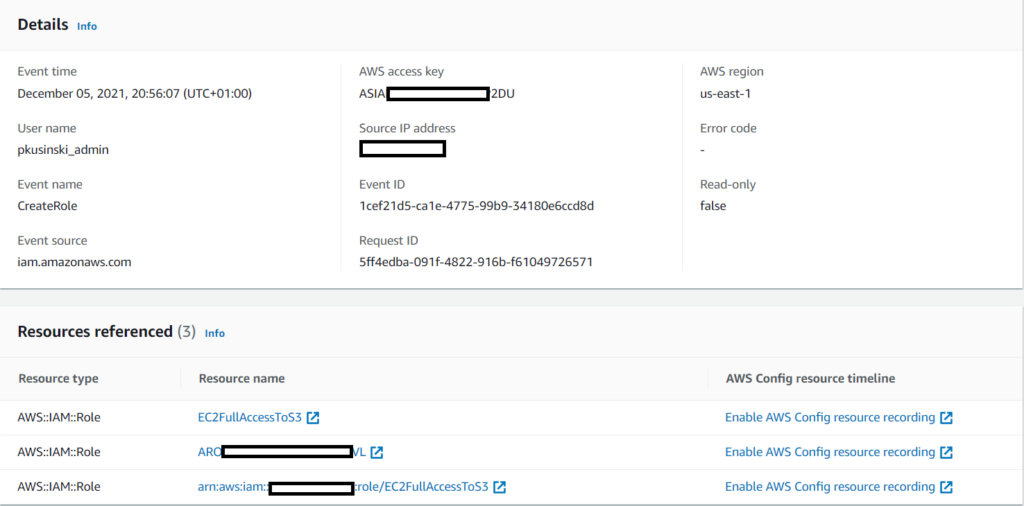
platform.system() and platform.release() are similar to uname -o and uname -r. It’s send along every our command, what we can verify by looking up into CloudTrail logs:

The easiest way to evade this type of finding would be to replace platform calls with, for example, hardcoded “secure” versions of the OS.
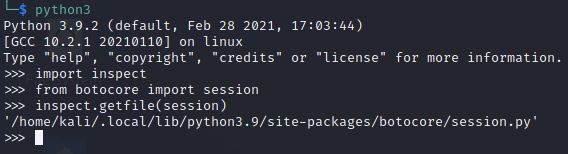
The fastest way to find session.py is to use another Python package – inspect!:
I’ve also created a little script which will try to replace both of these platform calls automatically:
https://gist.github.com/Djkusik/88d06ebaf7fbf9b7db99798a9f07fb6f
It will hardcode Linux/4.16.0 string into the library.
Little disclaimer – I tested it only on Linux, I don’t know how it would work with Windows. Furthermore, awscli was installed using pip – I couldn’t make it work with installation from a zip downloaded from amazonaws. Also – any update of this package will overwrite the changes.
The best way to avoid these problems would be to monkey patch this function – for example by creating a wrapper for awscli.
So let’s try it in action! I’ve created two users – kali_default and kali_modified – the first one will make a few commands with default userAgent from Kali Linux.
Results?
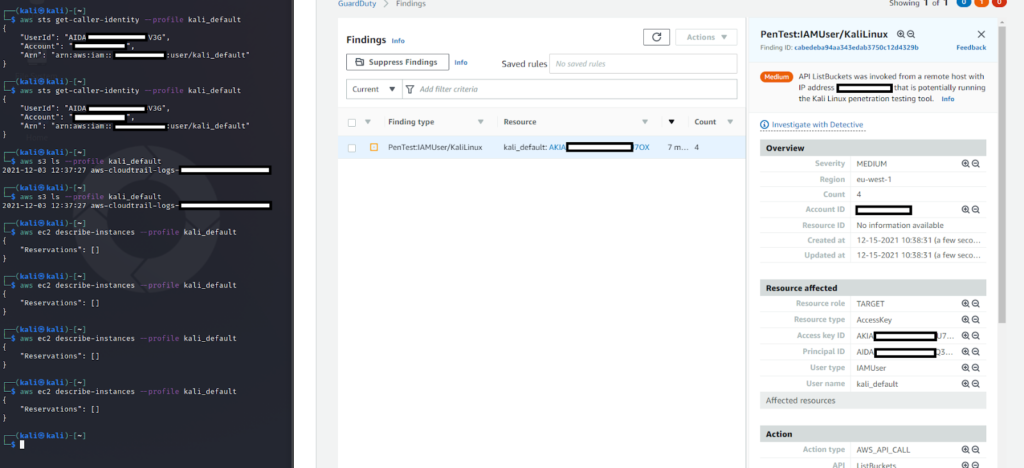
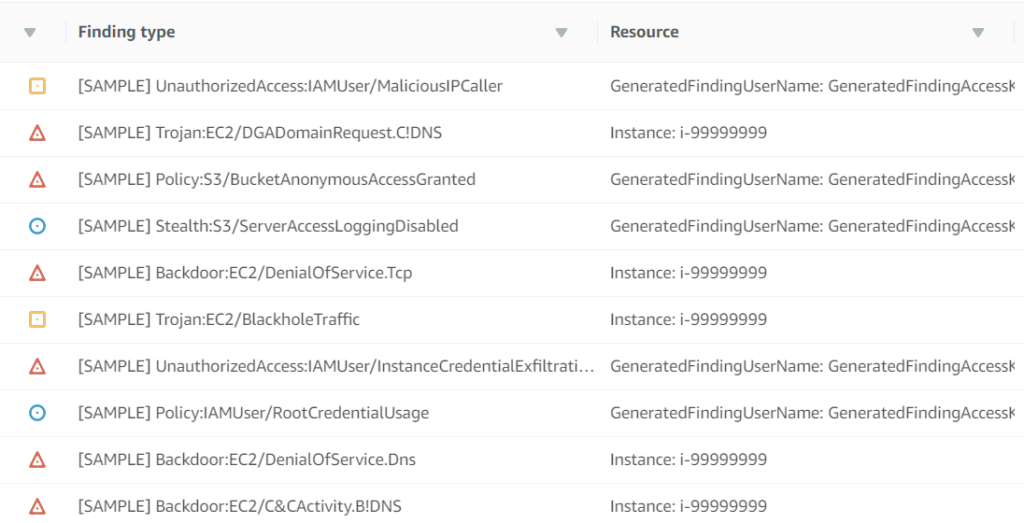
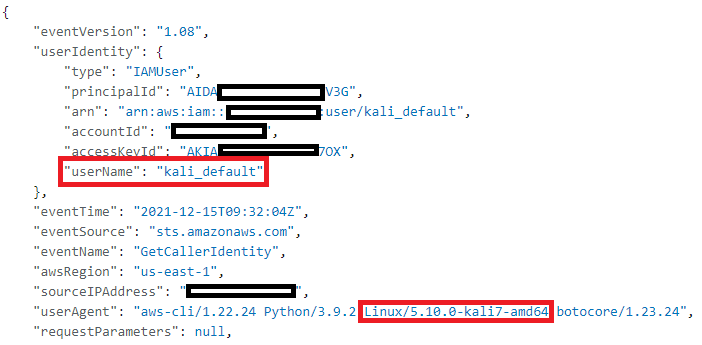
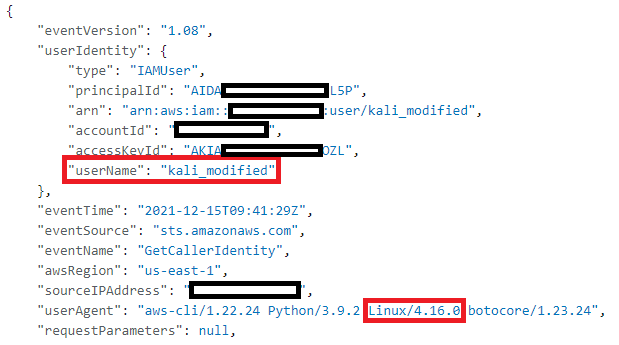
After a few moments, we can see PenTest finding in our GuardDuty dashboard (this doesn’t work instantly after receiving the commands). We can also verify that by searching through CloudTrail logs, that userAgent is saying that we are using Kali Linux:
So now, let’s run our script and send some commands again:
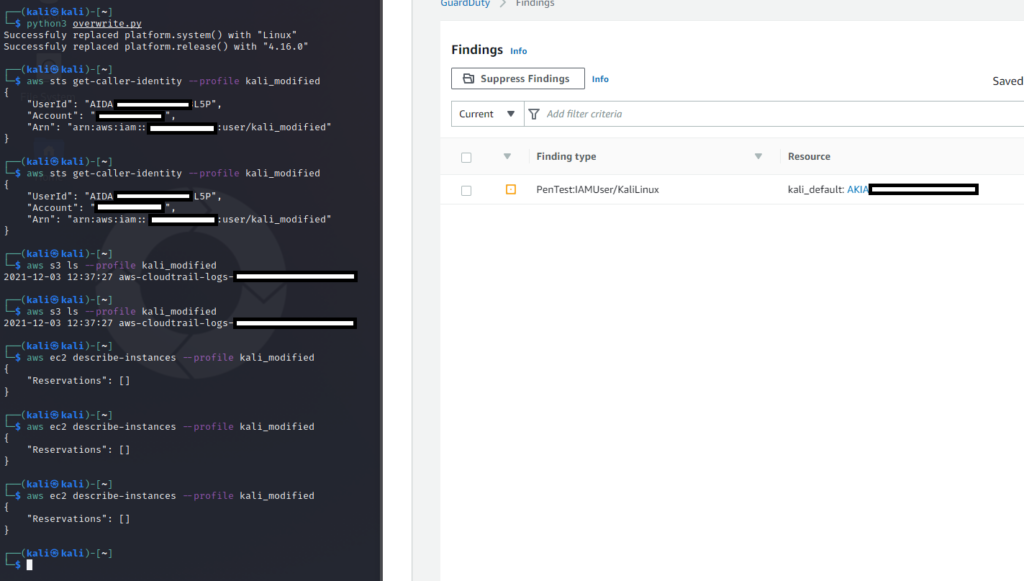
I’ve waited, but GuardDuty stayed silent – let’s look up into the CloudTrail logs:
Everything worked, GuardDuty didn’t notice anything.
But to be honest – I really doubt that this finding would help – probably it could detect some script kiddies or irritate you during ordered pentests when someone will use Kali without hiding its release.
InstanceCredentialExfiltration Finding
Update March 2022 – This issue is now fixed and GuardDuty informs us about usage of EC2 credentials from another AWS Account: source
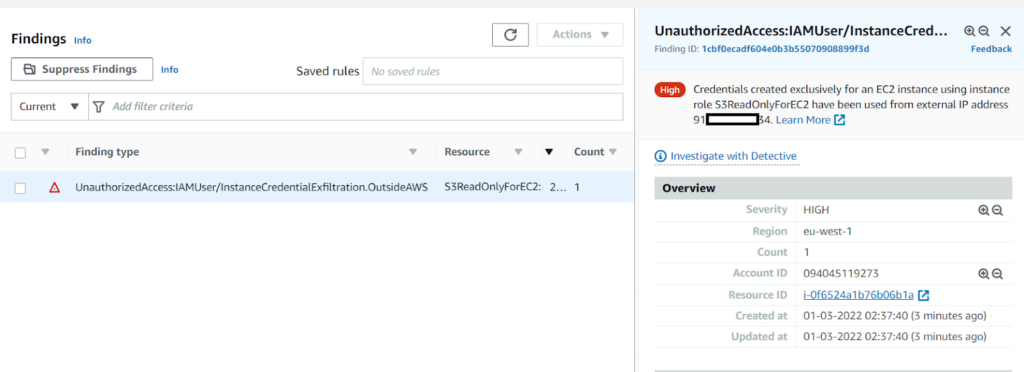
InstanceCredentialExfiltration finding of GuardDuty detects if:
“Credentials that were created exclusively for an EC2 instance through an Instance launch role are being used from an external IP address”.
In other words – it detects if someone is using our attached EC2 role outside of our EC2 instance. What could be ambiguous is “external IP address”, as there is a little problem. It doesn’t mean IP address outside of our infrastructure, it means IP address outside of AWS infrastructure. You could probably see the problem here now. Using exfiltrated credentials on your PC or from VPS of another cloud provider would set off an alarm, but using them on an EC2 instance (on a different account) wouldn’t!
Let’s test it.
I created two instances on one of my accounts and attached an IAM role to it:

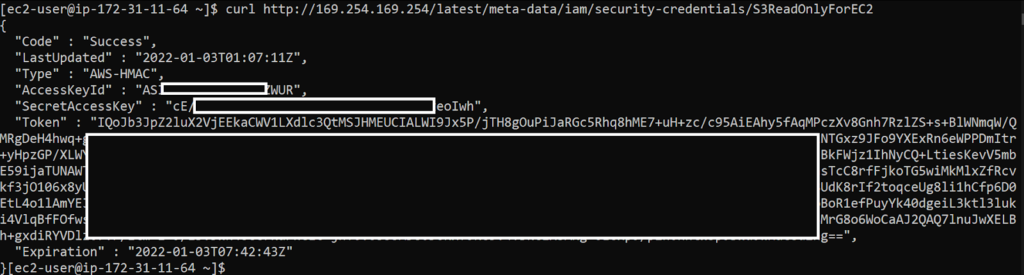
I got aws_access_key_id, aws_secret_access_key and aws_session_token from both of them – by connecting through SSH and curling them from the metadata service for simplicity:
Firstly I tried to use the first set of credentials from my local PC (multiple times even outside of the screenshot):
And as we can see, after few moments (to be honest – surprisingly long moments) a new finding shown in my GuardDuty console:
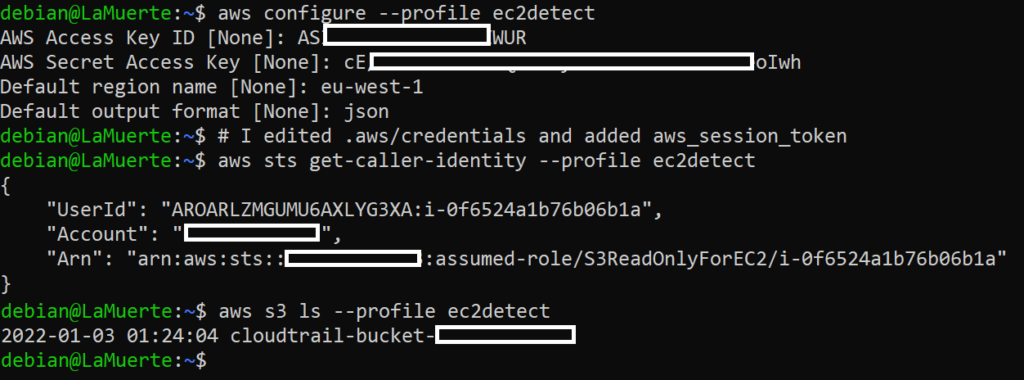
Then I created a new machine on another account:

I connected to it and used second set of credentials from it:
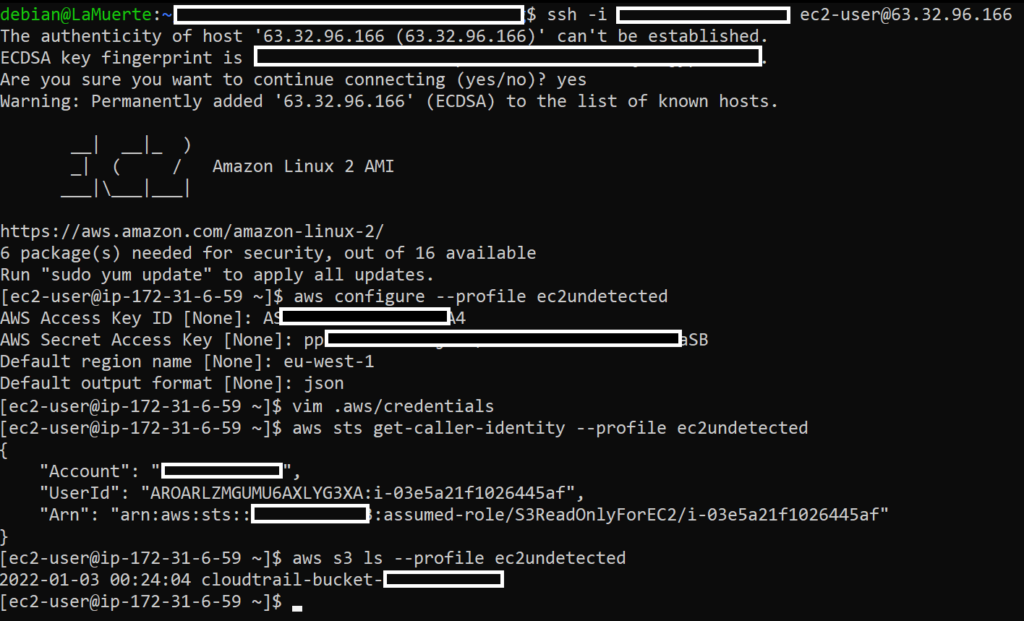
As we can see in CloudTrail history, there are logs of using credentials from my second machine (UndetectedInstanceCredentialExf with ID i-03e5a21f1026445af):
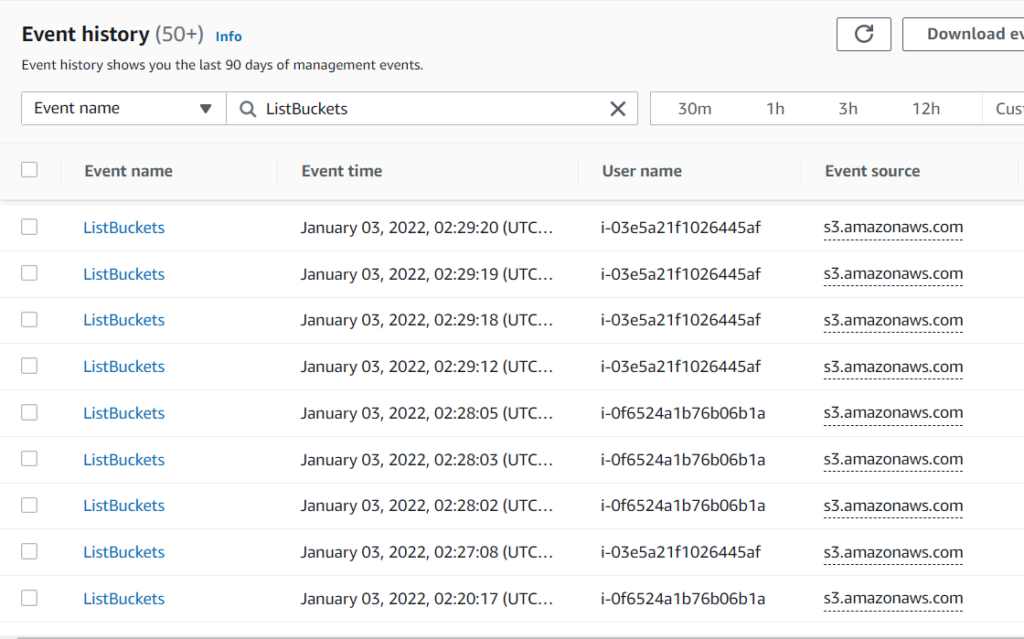
GuardDuty stayed silent this time!
I feel sorry for how this finding works, as it could be a great detector for most ec2 credentials thefts, but in this situation, most of the experienced attackers would be able to easily evade it. From the other side – I also understand that upgrading GuardDuty to verify exact IP addresses at the time of API call is probably near to impossible (Update March 2022 – I was wrong!).
Last words
As you can see, there are a lot of AWS monitoring services, it’s easy to get lost or forget about some of them. Each of them is built for a different purpose, which makes it even harder. That’s why I wanted to create this sum up of the most important ones and maintain this article up to date. Maybe even describe all of them.
During our Practical AWS Security training we also present these services (and more) – we talk about e.g their use cases, pros and cons or discuss how to implement them in your company.
If you want to ask me something or discuss this article, you can catch me by messaging through my LinkedIn or Twitter account!